D03.从0到1实现一个发票信息提取智能体
发票的OCR识别对于现今而言,可以说比较成熟了;今天我们来从0到1实现一个基于大模型的发票提取智能体,也基于此看看大模型开发和传统的开发之间,有什么区别
一、系统架构设计
1.1 设计目标
大模型发票信息提取方案,主要基于SpringAI+多模态大模型,实现零配置、高泛化、端到端的发票智能提取系统,核心优势:
- 无需模板:直接理解任意版式发票
- 语义理解:理解发票内容而非单纯OCR
- 结构化输出:直接生成可入库的数据结构
1.2 系统整体架构
对应的系统架构设计如下
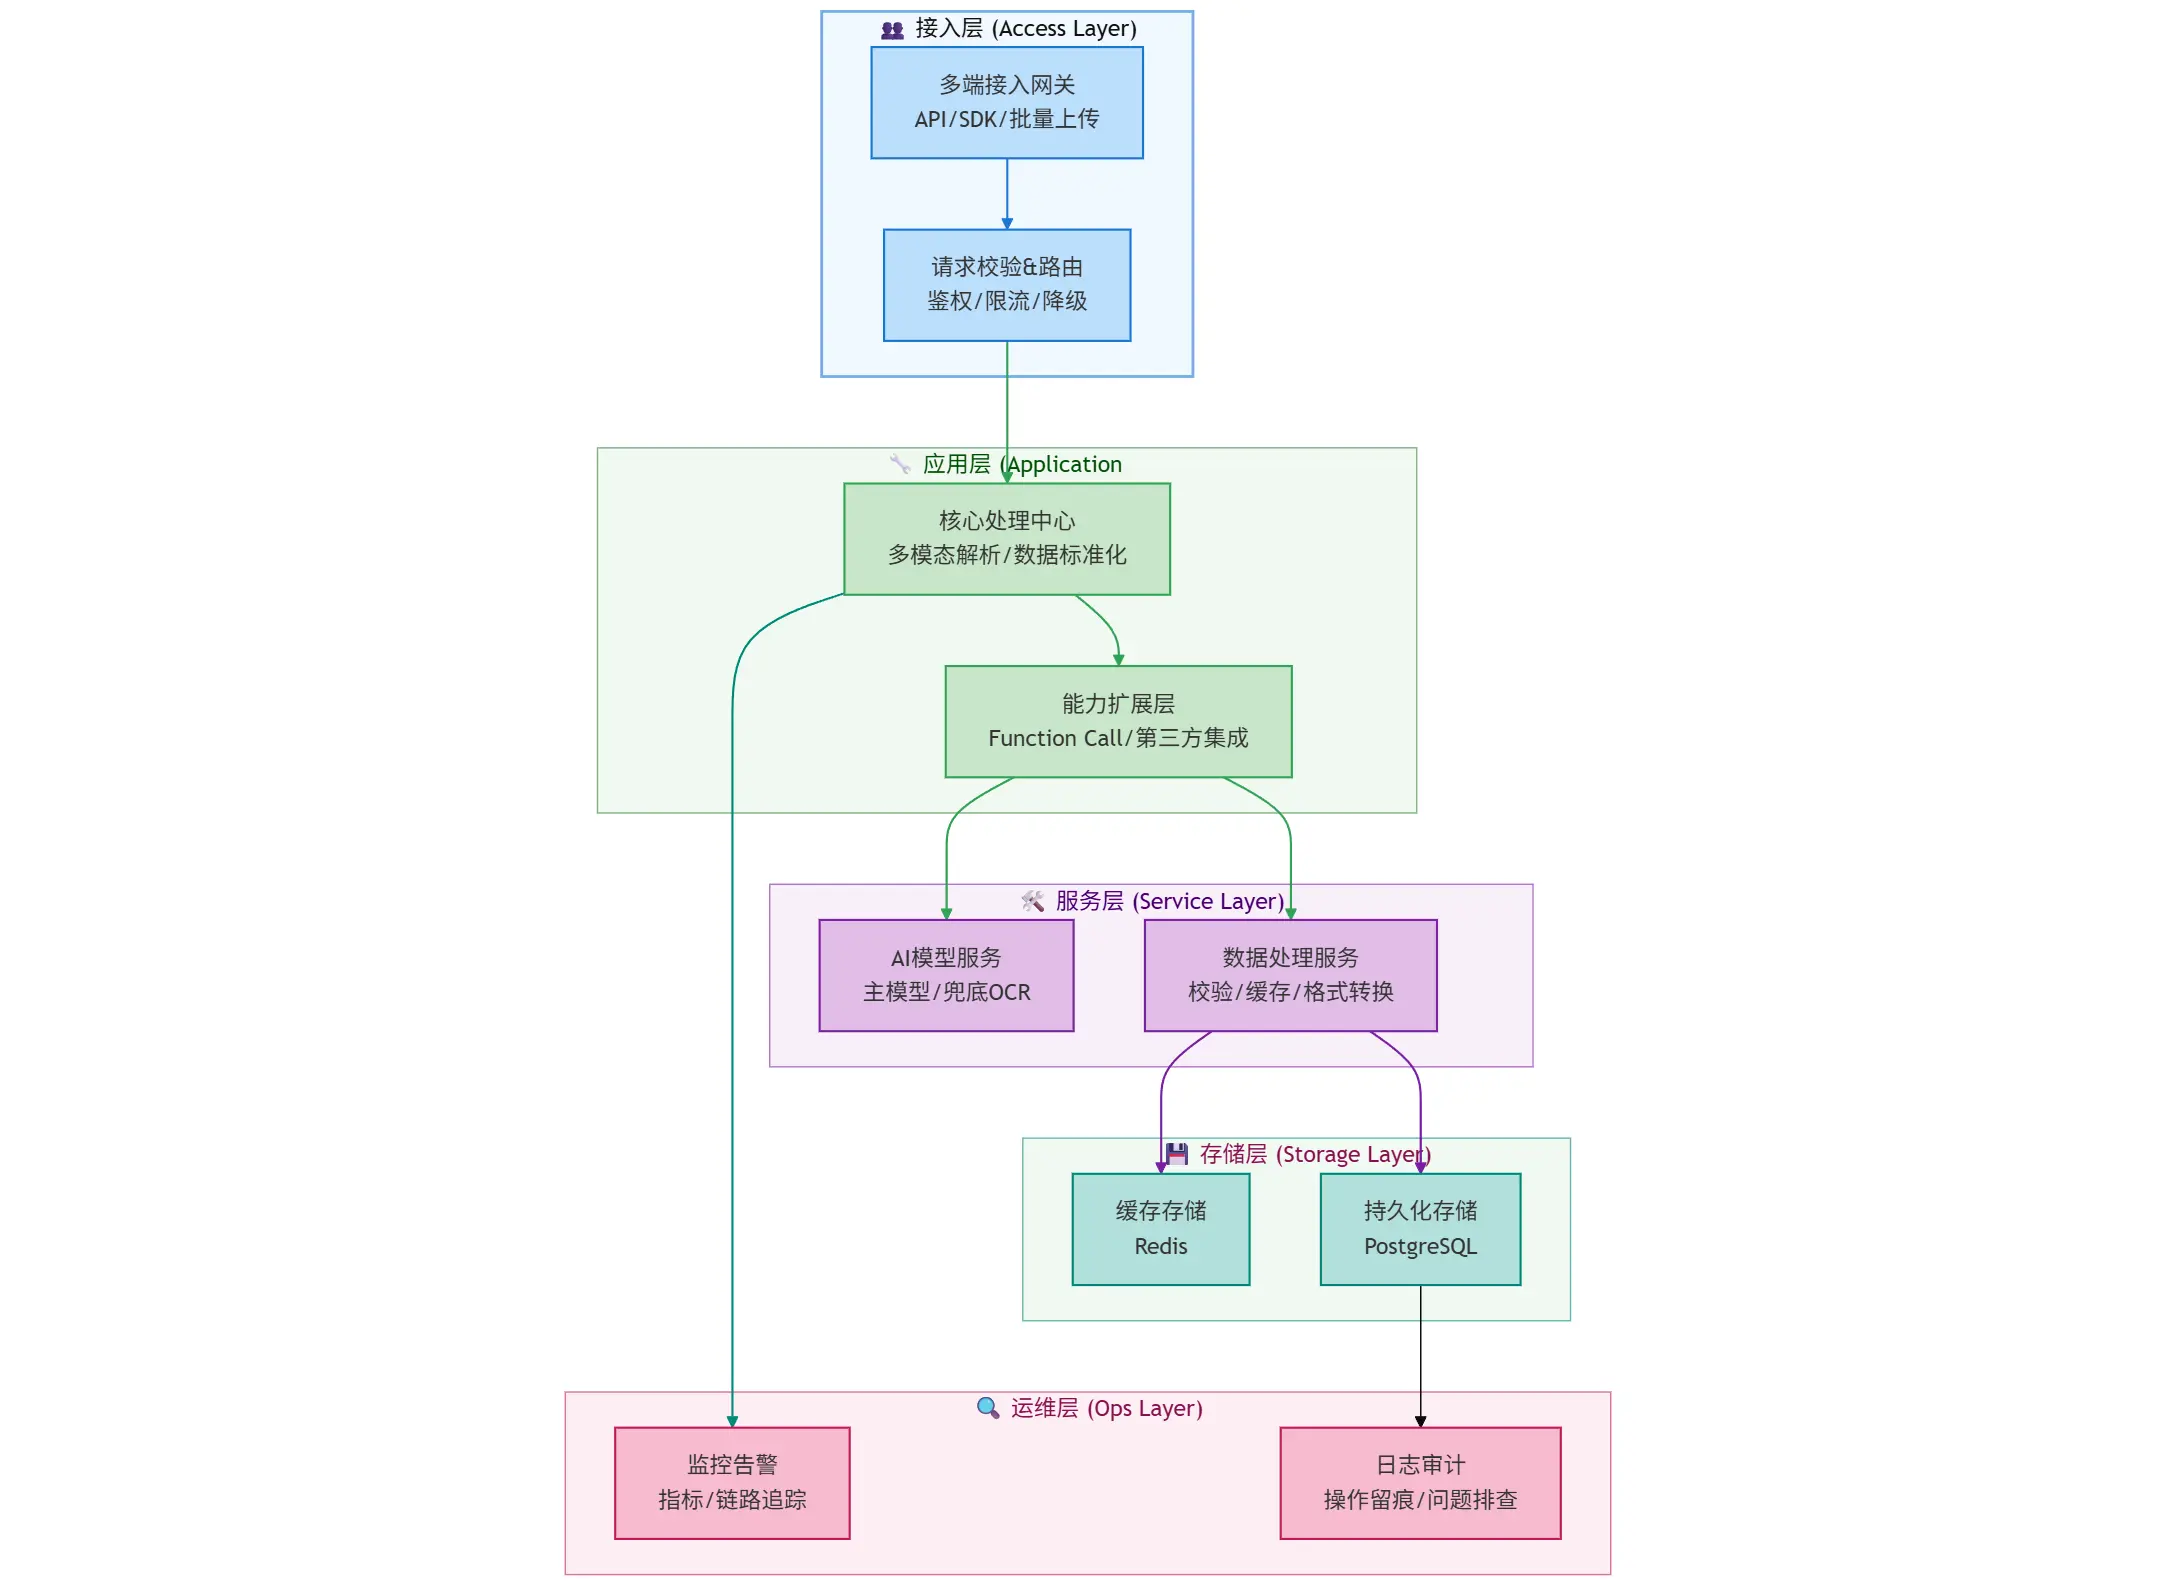
从整体的分层结构来看,一个完整的发票提取包含:
- 接入层:负责接收外部请求、做初步流量治理
- 定位:可以理解为全局网关,承接外部流量并过滤非法请求
- 应用层:做发票的多模态解析(比如识别票据图片、解析文本) + 数据标准化(统一发票信息的格式);
- 定位: “业务中枢”,串联下游服务、实现发票提取的核心流程
- 服务层:把具体技术能力封装为独立服务,供应用层调用
- 定位:能力组件库,解耦业务逻辑与技术实现。
- 存储层:按数据特性分两类存储:缓存存储(Redis)存高频访问的发票信息,提升查询效率 + 持久化存储(PostgreSQL)存全量发票数据,做长期归档。
- 定位:数据仓库,保障数据的高效访问与长期留存。
- 运维层:监控与审计
- 定位:运维保障,确保全流程可观测、问题可追溯
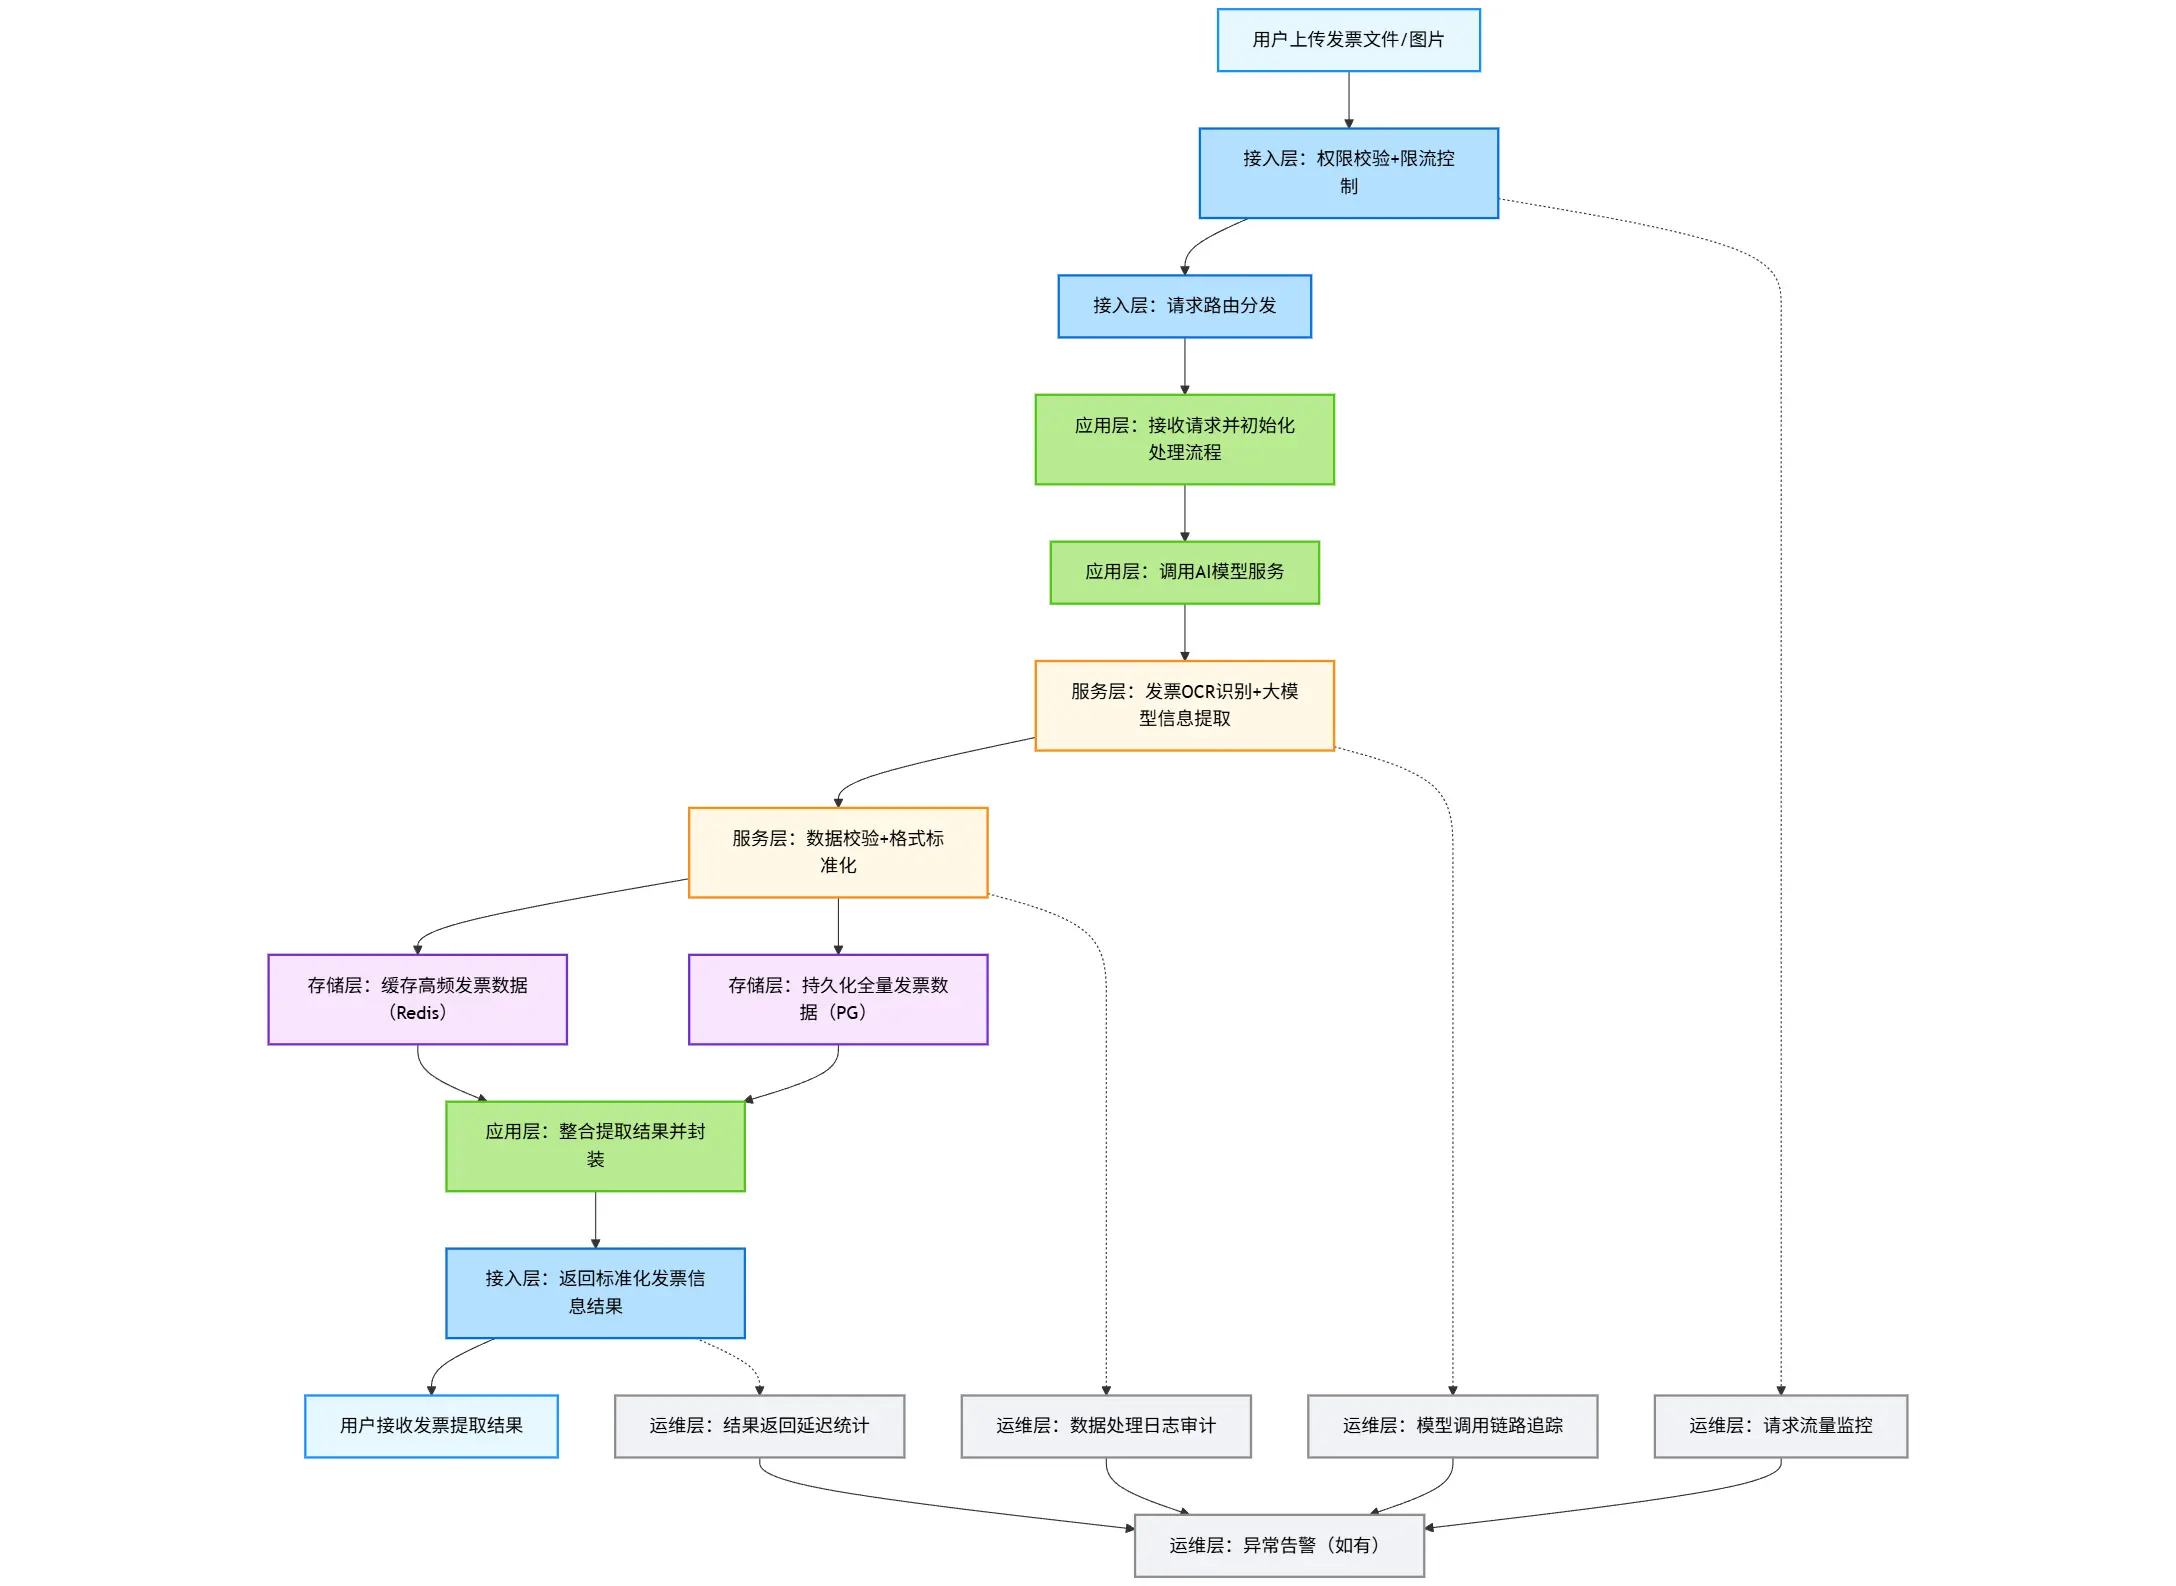
1.3 业务流程
基于上面的系统架构,我们可以串一下发票信息提取的全流程
- 用户上传发票
- 后端应用接受请求,做一些基本过滤
- 应用层处理发票识别逻辑
- 服务层与大模型交互,提取识别结果,并存储相关的数据
graph TD
    %% 样式定义:按架构分层设置配色,适配研发视角
    classDef userLayer fill:#e6f7ff,stroke:#1890ff,stroke-width:2px,color:#000;
    classDef accessLayer fill:#b3e0ff,stroke:#096dd9,stroke-width:2px,color:#000;
    classDef appLayer fill:#b7eb8f,stroke:#52c41a,stroke-width:2px,color:#000;
    classDef serviceLayer fill:#fff7e6,stroke:#fa8c16,stroke-width:2px,color:#000;
    classDef storageLayer fill:#f9e5ff,stroke:#722ed1,stroke-width:2px,color:#000;
    classDef opsLayer fill:#f0f2f5,stroke:#8c8c8c,stroke-width:2px,color:#000;

    %% 流程节点
    A[用户上传发票文件/图片]:::userLayer --> B[接入层:权限校验+限流控制]:::accessLayer
    B --> C[接入层:请求路由分发]:::accessLayer
    C --> D[应用层:接收请求并初始化处理流程]:::appLayer
    D --> E[应用层:调用AI模型服务]:::appLayer
    E --> F[服务层:发票OCR识别+大模型信息提取]:::serviceLayer
    F --> G[服务层:数据校验+格式标准化]:::serviceLayer
    G --> H[存储层:缓存高频发票数据(Redis)]:::storageLayer
    G --> I[存储层:持久化全量发票数据(PG)]:::storageLayer
    H & I --> J[应用层:整合提取结果并封装]:::appLayer
    J --> K[接入层:返回标准化发票信息结果]:::accessLayer
    K --> L[用户接收发票提取结果]:::userLayer

    %% 运维层全流程监控(并行)
    B -.-> M[运维层:请求流量监控]:::opsLayer
    F -.-> N[运维层:模型调用链路追踪]:::opsLayer
    G -.-> O[运维层:数据处理日志审计]:::opsLayer
    K -.-> P[运维层:结果返回延迟统计]:::opsLayer
    M & N & O & P --> Q[运维层:异常告警(如有)]:::opsLayer
二、数据结构设计
一个完整的应用实现应该包含我们上面提到的六层结构;当然由于篇幅有限,我们这里则只抓重点,主要关注下大模型这一层的交互实现上;对于持久化、运维监控这块就一笔带过
2.1 发票核心数据模型
发票本身的类型较多,不同的发票对应的信息也不太一样,这块的专业性有一点高;如果不太熟悉这块业务背景的小伙伴,直接对照发票来验证即可,比如下面这是一张从baidu上找到的专票
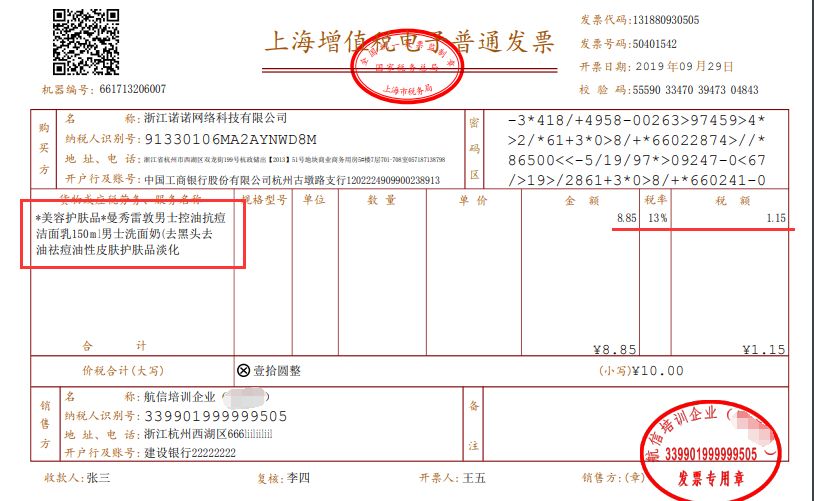
从这个票面信息,我们可以定义销售方、购买方信息(核心是名称 + 纳税人识别号)
@JsonClassDescription(value = "发票方信息")
public record PartyInfo(
        @JsonPropertyDescription(value = "名称")
        String name,
        @JsonPropertyDescription(value = "纳税人识别号")
        String taxId,
        @JsonPropertyDescription(value = "地址")
        String address,
        @JsonPropertyDescription(value = "电话")
        String phone,
        @JsonPropertyDescription(value = "开户银行")
        String bank,
        @JsonPropertyDescription(value = "银行账号")
        String account) {
}
发票行信息(即商品、服务名称)
@JsonClassDescription(value = "发票商品明细")
public record InvoiceItem(
        @JsonPropertyDescription(value = "商品名称")
        String itemName,
        @JsonPropertyDescription(value = "商品规格")
        String specification,
        @JsonPropertyDescription(value = "单位")
        String unit,
        @JsonPropertyDescription(value = "数量")
        BigDecimal quantity,
        @JsonPropertyDescription(value = "单价")
        BigDecimal unitPrice,
        @JsonPropertyDescription(value = "金额")
        BigDecimal amount,
        @JsonPropertyDescription(value = "税率")
        BigDecimal taxRate,
        @JsonPropertyDescription(value = "税额")
        BigDecimal taxAmount,
        @JsonPropertyDescription(value = "价税合计")
        BigDecimal totalAmount) {
}
对应的发票信息
@Data
@JsonClassDescription(value = "发票完整信息")
public class InvoiceInfo {
    // 发票基本信息
    @JsonPropertyDescription(value = "发票类型,如:增值税专用发票")
    private String invoiceType;

    @JsonPropertyDescription(value = "发票代码,如:044001800111")
    private String invoiceCode;

    @JsonPropertyDescription(value = "发票号码,如:12345678")
    private String invoiceNumber;

    // 机器编号
    @JsonPropertyDescription(value = "机器编号,如:66173206007")
    private String machineNumber;

    @JsonPropertyDescription(value = "密码区,如:0-TZ099+/8<0*8+T98Z/<6T</L9>0-260<*L6/6T/S->>00998¥//<L82Z099*+/8<0*8+T9*/Z<¥<696<E9200-896+/8T*8-")
    private String passwordArea;

    @JsonPropertyDescription(value = "开票日期,如:2024-01-15")
    private LocalDate issueDate;

    @JsonPropertyDescription(value = "校验码,如:12345 67890 12345 67890")
    private String checkCode;

    // 购销双方信息
    @JsonPropertyDescription(value = "销售方信息")
    private PartyInfo seller;

    @JsonPropertyDescription(value = "购买方信息")
    private PartyInfo buyer;

    // 金额信息
    @JsonPropertyDescription(value = "不含税金额")
    private BigDecimal amountWithoutTax;

    @JsonPropertyDescription(value = "税额")
    private BigDecimal taxAmount;

    @JsonPropertyDescription(value = "价税合计")
    private BigDecimal totalAmount;

    @JsonPropertyDescription(value = "税率,如:0.13")
    private BigDecimal taxRate;

    @JsonPropertyDescription(value = "备注")
    private String remark;

    @JsonPropertyDescription(value = "收款人")
    private String payee;

    @JsonPropertyDescription(value = "复核人")
    private String reviewer;

    @JsonPropertyDescription(value = "开票人")
    private String issuer;

    // 系统信息
    @JsonPropertyDescription(value = "发票图片MD5")
    private String imageHash;

    @JsonPropertyDescription(value = "提取置信度,如:0.95")
    private Double confidence;

    @JsonPropertyDescription(value = "提取时间")
    private LocalDateTime extractTime;

    @JsonPropertyDescription(value = "商品/服务明细列表")
    private List<InvoiceItem> items;
}
2.2 请求响应模型
如果我们希望提供一个功能齐全的发票提取服务,那么有必要好好设计一下提供REST API(最好是基于真实的业务诉求来设计),我们先做一个非常基础简单的能力提供
上传方式:
- 传发票文件
- 传base64图格式放票
- 传http格式发票
- 指定是否需要解析发票的商品行
@Data
@Schema(description = "发票提取请求")
public class InvoiceExtractRequest {

    @Schema(description = "发票图片,如果是http开头表示发票访问链接;如果是 data:image/png;base64, 开头表示为base64格式图片")
    private String image;

    @Schema(description = "图片格式", example = "image/jpeg")
    private String imageType;

    @Schema(description = "是否需要商品明细", example = "true")
    private boolean needItems = true;

    @Schema(description = "提示信息")
    private String msg;
}
对应的返回比较常见了
// 定义一个枚举状态,用于标记识别结果
public enum ProcessStatus {
    SUCCESS,
    PARTIAL_SUCCESS,
    VALIDATION_FAILED,
    OCR_FAILED,
    TIMEOUT,
    ERROR
}


// 返回的包装结果
@Data
@Accessors(chain = true)
@Schema(description = "发票提取响应")
public class InvoiceExtractResponse {

    @Schema(description = "请求ID")
    private String requestId;

    @Schema(description = "处理状态")
    private ProcessStatus status;

    @Schema(description = "提取结果")
    private InvoiceInfo invoiceInfo;

    @Schema(description = "处理耗时(ms)")
    private Long processTime;

    @Schema(description = "错误信息")
    private String errorMessage;
}
三、项目搭建
首先我们需要搭建要给SpringAI的项目,不太熟悉的小伙伴可以参照 01.创建一个SpringAI的示例工程 | 一灰灰的站点 来完成
在下面的实现过程中,我们使用智谱的免费大模型作为我们的实际载体;若希望使用其他的模型的小伙伴,也可以直接替换(SpringAI对不同厂商的大模型集成得相当可以,切换成本较低)
3.1 基础环境
我们使用的SpringAI的版本为最新的 1.1.2 ,此外直接使用 zhipu 的starter来作为大模型的交互客户端
<!-- pom.xml 关键依赖 -->
<dependencies>
    <dependency>
        <groupId>org.springframework.boot</groupId>
        <artifactId>spring-boot-starter-web</artifactId>
    </dependency>
    <dependency>
        <groupId>org.springframework.ai</groupId>
        <artifactId>spring-ai-starter-model-zhipuai</artifactId>
    </dependency>
    <dependency>
        <groupId>cn.hutool</groupId>
        <artifactId>hutool-http</artifactId>
        <version>5.8.38</version>
    </dependency>
</dependencies>
然后在配置文件中,设置对应的配置信息,其中关键点为
- api-key: 可以通过启动参数、系统环境变量等方式注入key,从而避免硬编码导致的泄露问题
- model: 选择的是免费的
GLM-4.1V-Thinking-Flash, 支持图片识别(相比较于GLM-4V-Flash上下文窗口更大,但是响应也更慢) - temperature: 0.1 低温度,保证提取的稳定性
# application.yml
spring:
  ai:
    zhipuai:
      # api-key 使用你自己申请的进行替换;如果为了安全考虑,可以通过启动参数进行设置
      api-key: ${zhipuai-api-key}
      chat:
        options:
          model: GLM-4.1V-Thinking-Flash  # 视觉理解模型, 这个模型的上下文窗口 64K,比 GLM-4V-Flash 的 4K 可以返回更多的内容
          temperature: 0.1 # 低温度,保证提取的稳定性


# 修改日志级别
logging:
  level:
    org.springframework.ai.chat.client.advisor.SimpleLoggerAdvisor: debug
3.2 可选的发票提取工具页
为了更好的进行交互体验,我们实现一个网页交互页面,用于上传发票、查看返回结果,直接基于 thymleaf 来实现
因此添加依赖 spring-boot-starter-thymeleaf
<dependency>
    <groupId>org.springframework.boot</groupId>
    <artifactId>spring-boot-starter-thymeleaf</artifactId>
</dependency>
如果本地开发,需要修改前端页面的小伙伴,可以考虑关闭缓存 (可选配置)
# application.yml
spring:
  thymeleaf:
    cache: false
四、核心实现代码
4.1 提示词管理
首先我们需要制定大模型来提取结构化发票的提示词,区别于 大模型应用开发实战:两百行实现一个自然语言地址提取智能体 中的硬编码实现方式,我们将提示词统一放在资源目录下 resources/prompt 命名为 xxx.pt的文本中保存提示词模板
一个可用于大模型提取发票的提示词如下
你是一个专业的发票信息提取专家。请从用户提供的发票图片中提取完整的结构化信息。

必须遵循:
1. 准确识别发票类型(增值税专用发票、增值税普通发票、电子普通发票等)
2. 提取所有关键字段:发票代码、发票号码、开票日期、校验码等
3. 识别购销双方完整信息(名称、纳税人识别号、地址电话、开户行及账号)
4. 提取商品明细,包括商品名称、规格、单位、数量、单价、金额、税率、税额
5. 计算并核对金额:不含税金额、税额、价税合计
6. 识别备注、收款人、复核人、开票人等信息
7. 对于模糊或不清晰或无法识别的字段,请使用null值。
8. 请确保所有金额字段为数字类型,日期为字符串格式。
9. 请务必返回完整内容,不要截断JSON。

输出格式要求:
请严格按照以下JSON格式输出,不要包含任何额外文本:
{
  "invoiceType": "发票类型",
  "invoiceCode": "发票代码",
  "invoiceNumber": "发票号码",
  "issueDate": "YYYY-MM-DD",
  "checkCode": "校验码",
  "seller": {
    "name": "销售方名称",
    "taxId": "纳税人识别号",
    "address": "地址",
    "phone": "电话",
    "bank": "开户行",
    "account": "账号"
  },
  "buyer": {
    "name": "购买方名称",
    "taxId": "纳税人识别号",
    "address": "地址",
    "phone": "电话",
    "bank": "开户行",
    "account": "账号"
  },
  "amountWithoutTax": 1000.00,
  "taxAmount": 130.00,
  "totalAmount": 1130.00,
  "taxRate": 0.13,
  "items": [
    {
      "itemName": "商品名称",
      "specification": "规格型号",
      "unit": "单位",
      "quantity": 1.0,
      "unitPrice": 1000.00,
      "amount": 1000.00,
      "taxRate": 0.13,
      "taxAmount": 130.00,
      "totalAmount": 1130.00
    }
  ],
  "remark": "备注信息",
  "payee": "收款人",
  "reviewer": "复核人",
  "issuer": "开票人",
  "confidence": 0.95
}
4.2 提示词注入
然后在应用中,对应的提示词可以直接使用 @Value 注解进行注入,如提取服务的初始化
@Slf4j
@Service
public class InvoiceExtractionService {

    @Value("classpath:/prompts/invoice-extract.st")
    private Resource invoiceSystemPrompt;

    private final ChatModel chatModel;
    private final ChatClient chatClient;

    public InvoiceExtractionService(ChatModel chatModel) {
        this.chatModel = chatModel;
        this.chatClient = ChatClient.builder(chatModel)
                .defaultAdvisors(new SimpleLoggerAdvisor())
                .build();
    }
}
4.3 基于大模型的发票信息提取
接下来就是核心的借助SpringAI实现大模型的交互,基于多模态的交互方案,传入系统提示词、用户消息+图片,定义结果化返回,以此来获取响应结果
不到十行的代码,就可以实现提取逻辑(属实是有点夸张了啊~)
/**
 * 识别发票内容
 *
 * @param imageBytes 图片字节
 * @param mimeType   图片类型
 * @param msg        识别提示信息
 * @return
 */
public InvoiceInfo extractInvoice(byte[] imageBytes, MimeType mimeType, String msg) {
    long start = System.currentTimeMillis();
    Message systemMsg = new SystemMessage(invoiceSystemPrompt);
    Media media = Media.builder().mimeType(mimeType).data(imageBytes).build();
    Message userMsg = UserMessage.builder().text((msg != null && !msg.isEmpty()) ? msg : "请将发票图片内容进行识别,并返回结构化的发票信息").media(media).build();

    Prompt prompt = new Prompt(List.of(systemMsg, userMsg));
    InvoiceInfo invoiceInfo = chatClient.prompt(prompt).call().entity(InvoiceInfo.class);
    log.info("解析耗时:{} 返回: \n{}", System.currentTimeMillis() - start, toStr(invoiceInfo));
    return invoiceInfo;
}
4.4 验证接口
接下来为了快速验证效果,我们可以整一个简单的验证接口,接收上传的发票,返回提取结果
@Controller
public class InvoiceExtractionController {
    private final InvoiceExtractionService invoiceExtractionService;

    public InvoiceExtractionController(InvoiceExtractionService invoiceExtractionService) {
        this.invoiceExtractionService = invoiceExtractionService;
    }

    /**
     * 上传发票图片并提取内容
     *
     * @param file 上传的发票图片文件
     * @param msg  识别提示信息
     * @return 识别结果
     */
    @ResponseBody
    @PostMapping(path = "/extractInvoice")
    public InvoiceInfo extractInvoice(@RequestParam("file") MultipartFile file,
                                      @RequestParam(value = "msg", required = false) String msg
    ) throws IOException {
        byte[] imageBytes = file.getBytes();
        MimeType mimeType = MimeType.valueOf(file.getContentType());
        return invoiceExtractionService.extractInvoice(imageBytes, mimeType, msg);
    }


    /**
     * 显示发票识别页面
     *
     * @return HTML页面
     */
    @GetMapping("/invoicePage")
    public String invoicePage(Model model) {
        return "invoice_extraction";
    }
}
然后让AI帮我生成一个交互的前端页面, invoice_extraction.html,放在 resources/template 目录下
<!DOCTYPE html>
<html lang="zh-CN">
<head>
<meta charset="UTF-8">
<meta name="viewport" content="width=device-width, initial-scale=1.0">
<title>发票信息提取</title>
<style>
body {
font-family: Arial, sans-serif;
max-width: 1600px;
margin: 0 auto;
padding: 20px;
background-color: #f5f5f5;
}
.container {
background-color: white;
border-radius: 8px;
padding: 10px;
box-shadow: 0 2px 10px rgba(0, 0, 0, 0.1);
}
h1 {
text-align: center;
color: #333;
margin-bottom: 10px;
}
.main-layout {
display: flex;
gap: 20px;
align-items: flex-start;
}
.left-panel, .right-panel {
flex: 3;
min-width: 0;
min-height: 400px;
border: 1px dashed #ccc;
text-align: center;
}
.center-panel {
flex: 1;
text-align: center;
min-height: 400px;
border: 1px dashed #ccc;
padding: 12px;
}
.panel {
background-color: #f9f9f9;
border-radius: 8px;
padding: 20px;
box-shadow: 0 1px 3px rgba(0, 0, 0, 0.1);
}
.upload-area {
border: 2px dashed #ccc;
border-radius: 8px;
padding: 20px;
text-align: center;
margin-bottom: 20px;
transition: border-color 0.3s;
}
.upload-area.highlight {
border-color: #007bff;
background-color: #f0f8ff;
}
.upload-area p {
margin: 0 0 15px 0;
color: #666;
}
.file-input {
display: none;
}
.upload-btn {
background-color: #007bff;
color: white;
padding: 10px 20px;
border: none;
border-radius: 4px;
cursor: pointer;
font-size: 16px;
margin: 10px 0;
}
.upload-btn:hover {
background-color: #0056b3;
}
.checkbox-container {
margin: 15px 0;
text-align: center;
display: block;
}
.checkbox-label-2 {
display: inline-flex;
align-items: center;
cursor: pointer;
font-size: 14px;
color: #666;
user-select: none;
}
.checkbox-input {
margin-right: 8px;
width: 16px;
height: 16px;
cursor: pointer;
vertical-align: middle;
}
.checkbox-text {
vertical-align: middle;
}
.preview-container {
text-align: center;
margin-top: 15px;
display: none;
}
.preview-container h3 {
margin-top: 0;
margin-bottom: 10px;
color: #333;
}
.preview-image {
max-width: 100%;
max-height: 350px;
border-radius: 4px;
box-shadow: 0 2px 5px rgba(0, 0, 0, 0.1);
border: 1px solid #eee;
}
.controls {
text-align: center;
margin: 20px 0;
}
.identify-btn {
background-color: #28a745;
color: white;
padding: 12px 30px;
border: none;
border-radius: 4px;
cursor: pointer;
font-size: 16px;
display: block;
width: 100%;
margin-bottom: 10px;
}
.identify-btn:hover {
background-color: #218838;
}
.clear-btn {
background-color: #dc3545;
color: white;
padding: 12px 30px;
border: none;
border-radius: 4px;
cursor: pointer;
font-size: 16px;
display: block;
width: 100%;
}
.clear-btn:hover {
background-color: #c82333;
}
.result-container {
margin-top: 20px;
}
.result-title {
font-weight: bold;
margin-bottom: 10px;
color: #333;
}
.result-content {
white-space: pre-wrap;
word-wrap: break-word;
max-height: 500px;
min-height: 300px;
overflow-y: auto;
background-color: white;
margin: 10px;
padding: 10px;
border-radius: 4px;
border: 1px solid #eee;
}
.loading {
text-align: center;
padding: 20px;
display: none;
}
.loading-spinner {
border: 4px solid #f3f3f3;
border-top: 4px solid #007bff;
border-radius: 50%;
width: 40px;
height: 40px;
animation: spin 1s linear infinite;
margin: 0 auto 10px;
}
@keyframes spin {
0% {
transform: rotate(0deg);
}
100% {
transform: rotate(360deg);
}
}
.paste-area {
margin-top: 15px;
padding: 10px;
border: 1px solid #eee;
border-radius: 4px;
background-color: #fafafa;
}
.paste-area p {
margin: 0;
font-size: 14px;
color: #666;
}
</style>
</head>
<body>
<div class="container">
<h1>发票信息提取系统</h1>
<div class="top">
<h3>选择发票图片</h3>
<div class="upload-area" id="uploadArea">
<p>点击下方按钮选择图片,或将图片拖拽到此区域</p>
<input type="file" id="fileInput" class="file-input" accept="image/*">
<button class="upload-btn" onclick="document.getElementById('fileInput').click()">选择图片</button>
<div class="paste-area">
<p>或者按 Ctrl+V 粘贴剪贴板中的图片</p>
</div>
</div>
</div>
<div class="main-layout panel">
<!-- 左侧面板:图片选择和预览 -->
<div class="left-panel">
<h3>图片预览</h3>
<div class="preview-container" id="previewContainer">
<img id="previewImage" class="preview-image" alt="预览图">
</div>
</div>
<!-- 中间面板:操作按钮 -->
<div class="center-panel">
<div>
<h3>操作区域</h3>
<div class="controls" id="controls" style="display:none;">
<button class="identify-btn" id="identifyBtn">识别发票信息</button>
<div class="checkbox-container">
<label class="checkbox-label-2">
<input type="checkbox" id="needItemsCheckbox" class="checkbox-input">
<span class="checkbox-text">发票行数提取</span>
</label>
</div>
<button class="clear-btn" id="clearBtn">清除</button>
</div>
<div class="loading" id="loading">
<div class="loading-spinner"></div>
<p>正在识别发票信息,请稍候...</p>
</div>
</div>
</div>
<!-- 右侧面板:识别结果 -->
<div class="right-panel">
<div>
<h3>识别结果</h3>
<div class="result-container" id="resultContainer">
<div id="resultContent" class="result-content"></div>
</div>
</div>
</div>
</div>
</div>
<script>
document.addEventListener('DOMContentLoaded', function () {
const uploadArea = document.getElementById('uploadArea');
const fileInput = document.getElementById('fileInput');
const previewContainer = document.getElementById('previewContainer');
const previewImage = document.getElementById('previewImage');
const controls = document.getElementById('controls');
const identifyBtn = document.getElementById('identifyBtn');
const clearBtn = document.getElementById('clearBtn');
const loading = document.getElementById('loading');
const resultContainer = document.getElementById('resultContainer');
const resultContent = document.getElementById('resultContent');
// 文件选择事件
fileInput.addEventListener('change', handleFileSelect);
// 拖拽事件
uploadArea.addEventListener('dragover', function (e) {
e.preventDefault();
uploadArea.classList.add('highlight');
});
uploadArea.addEventListener('dragleave', function (e) {
e.preventDefault();
uploadArea.classList.remove('highlight');
});
uploadArea.addEventListener('drop', function (e) {
e.preventDefault();
uploadArea.classList.remove('highlight');
if (e.dataTransfer.files.length > 0) {
handleFiles(e.dataTransfer.files);
}
});
// 粘贴事件
document.addEventListener('paste', function (e) {
if (e.clipboardData && e.clipboardData.items) {
let items = e.clipboardData.items;
for (let i = 0; i < items.length; i++) {
if (items[i].type.indexOf('image') !== -1) {
let blob = items[i].getAsFile();
handleFiles([blob]);
break;
}
}
}
});
// 清除按钮
clearBtn.addEventListener('click', function () {
fileInput.value = '';
previewContainer.style.display = 'none';
controls.style.display = 'none';
resultContainer.style.display = 'none';
uploadArea.classList.remove('highlight');
});
// 识别按钮
identifyBtn.addEventListener('click', identifyInvoice);
function handleFileSelect(e) {
if (e.target.files.length > 0) {
handleFiles(e.target.files);
}
}
function handleFiles(files) {
const file = files[0];
if (!file.type.match('image.*')) {
alert('请选择图片文件!');
return;
}
// 设置fileInput的files属性,以便识别按钮可以访问
if (fileInput.files !== files) {
// 创建一个新的FileList对象
const dataTransfer = new DataTransfer();
dataTransfer.items.add(file);
fileInput.files = dataTransfer.files;
}
const reader = new FileReader();
reader.onload = function (e) {
previewImage.src = e.target.result;
previewContainer.style.display = 'block';
controls.style.display = 'block';
};
reader.readAsDataURL(file);
}
async function identifyInvoice() {
if (!fileInput.files[0]) {
alert('请先选择一张图片!');
return;
}
loading.style.display = 'block';
resultContainer.style.display = 'none';
const formData = new FormData();
formData.append('file', fileInput.files[0]);
formData.append('msg', '请将发票图片内容进行识别,并返回结构化的发票信息');
// 新增参数:needItems
const needItemsCheckbox = document.getElementById('needItemsCheckbox');
formData.append('needItems', needItemsCheckbox.checked);
try {
const response = await fetch('/extractInvoice', {
method: 'POST',
body: formData
});
const result = await response.text();
// 尝试解析JSON并格式化显示
try {
const jsonData = JSON.parse(result);
resultContent.innerHTML = formatInvoiceData(jsonData);
} catch (e) {
// 如果不是有效的JSON,则直接显示原始文本
resultContent.textContent = result;
}
resultContainer.style.display = 'block';
} catch (error) {
console.error('识别失败:', error);
resultContent.textContent = '识别失败: ' + error.message;
resultContainer.style.display = 'block';
} finally {
loading.style.display = 'none';
}
}
});
// 格式化发票数据的函数
function formatInvoiceData(data) {
if (typeof data !== 'object') {
return '<p>无法解析的数据格式</p>';
}
let html = '<div class="formatted-result">';
// 如果是数组,遍历每个项目
if (Array.isArray(data)) {
html += '<h3>发票列表</h3>';
data.forEach((item, index) => {
html += `<div class="invoice-item"><h4>发票 ${index + 1}</h4>` + formatSingleInvoice(item) + '</div>';
});
} else {
// 单个发票对象
html += formatSingleInvoice(data);
}
html += '</div>';
return html;
}
function formatSingleInvoice(invoice) {
if (typeof invoice !== 'object') return '';
let html = '<table class="invoice-table" style="width: 100%; border-collapse: collapse; margin: 10px 0;">';
for (const [key, value] of Object.entries(invoice)) {
html += '<tr style="border-bottom: 1px solid #eee;">' +
`<td style="padding: 8px; text-align: left; font-weight: bold; width: 30%; background-color: #f8f9fa;">
` +
`${formatKey(key)}</td>
` +
`<td style="padding: 8px; text-align: left; width: 70%;">
` +
`${formatValue(value)}</td></tr>`;
}
html += '</table>';
return html;
}
function formatKey(key) {
const keyMap = {
'invoiceType': '发票类型',
'invoiceCode': '发票代码',
'invoiceNumber': '发票号码',
'invoiceDate': '开票日期',
'checkCode': '校验码',
'machineNumber': '机器编号',
'purchaserName': '购买方名称',
'purchaserTaxNumber': '购买方税号',
'purchaserAddressPhone': '购买方地址电话',
'purchaserBankAccount': '购买方开户行及账号',
'sellerName': '销售方名称',
'sellerTaxNumber': '销售方税号',
'sellerAddressPhone': '销售方地址电话',
'sellerBankAccount': '销售方开户行及账号',
'totalAmountInWords': '合计金额大写',
'totalAmountInFigures': '合计金额小写',
'taxTotalAmountInWords': '价税合计大写',
'taxTotalAmountInFigures': '价税合计小写',
'remark': '备注',
'cashier': '收款人',
'reviewer': '复核',
'checker': '开票人',
'goodsList': '货物或应税劳务清单',
'amount': '金额',
'taxRate': '税率',
'taxAmount': '税额'
};
return keyMap[key] || key.charAt(0).toUpperCase() + key.slice(1);
}
function formatValue(value) {
if (value === null || value === undefined) {
return '<span style="color: #999; font-style: italic;">无数据</span>';
}
if (typeof value === 'object') {
if (Array.isArray(value)) {
if (value.length === 0) return '无数据';
let listHtml = '<div style="margin: 5px 0;">';
value.forEach((item, index) => {
if (typeof item === 'object') {
listHtml += `<div style="border: 1px solid #eee; margin: 5px 0; padding: 8px; border-radius: 4px;"><strong>项目 ${index + 1}:</strong>`;
for (const [k, v] of Object.entries(item)) {
listHtml += `<div style="margin-left: 10px;"><strong>${formatKey(k)}:</strong> ${formatValue(v)}</div>`;
}
listHtml += '</div>';
} else {
listHtml += `<div>${index + 1}. ${formatValue(item)}</div>`;
}
});
listHtml += '</div>';
return listHtml;
} else {
// 嵌套对象递归处理
let objHtml = '<div style="margin: 5px 0; padding: 8px; border-left: 3px solid #007bff;">';
for (const [k, v] of Object.entries(value)) {
objHtml += `<div><strong>${formatKey(k)}:</strong> ${formatValue(v)}</div>`;
}
objHtml += '</div>';
return objHtml;
}
}
return String(value);
}
</script>
</body>
</html>
实际体验如下
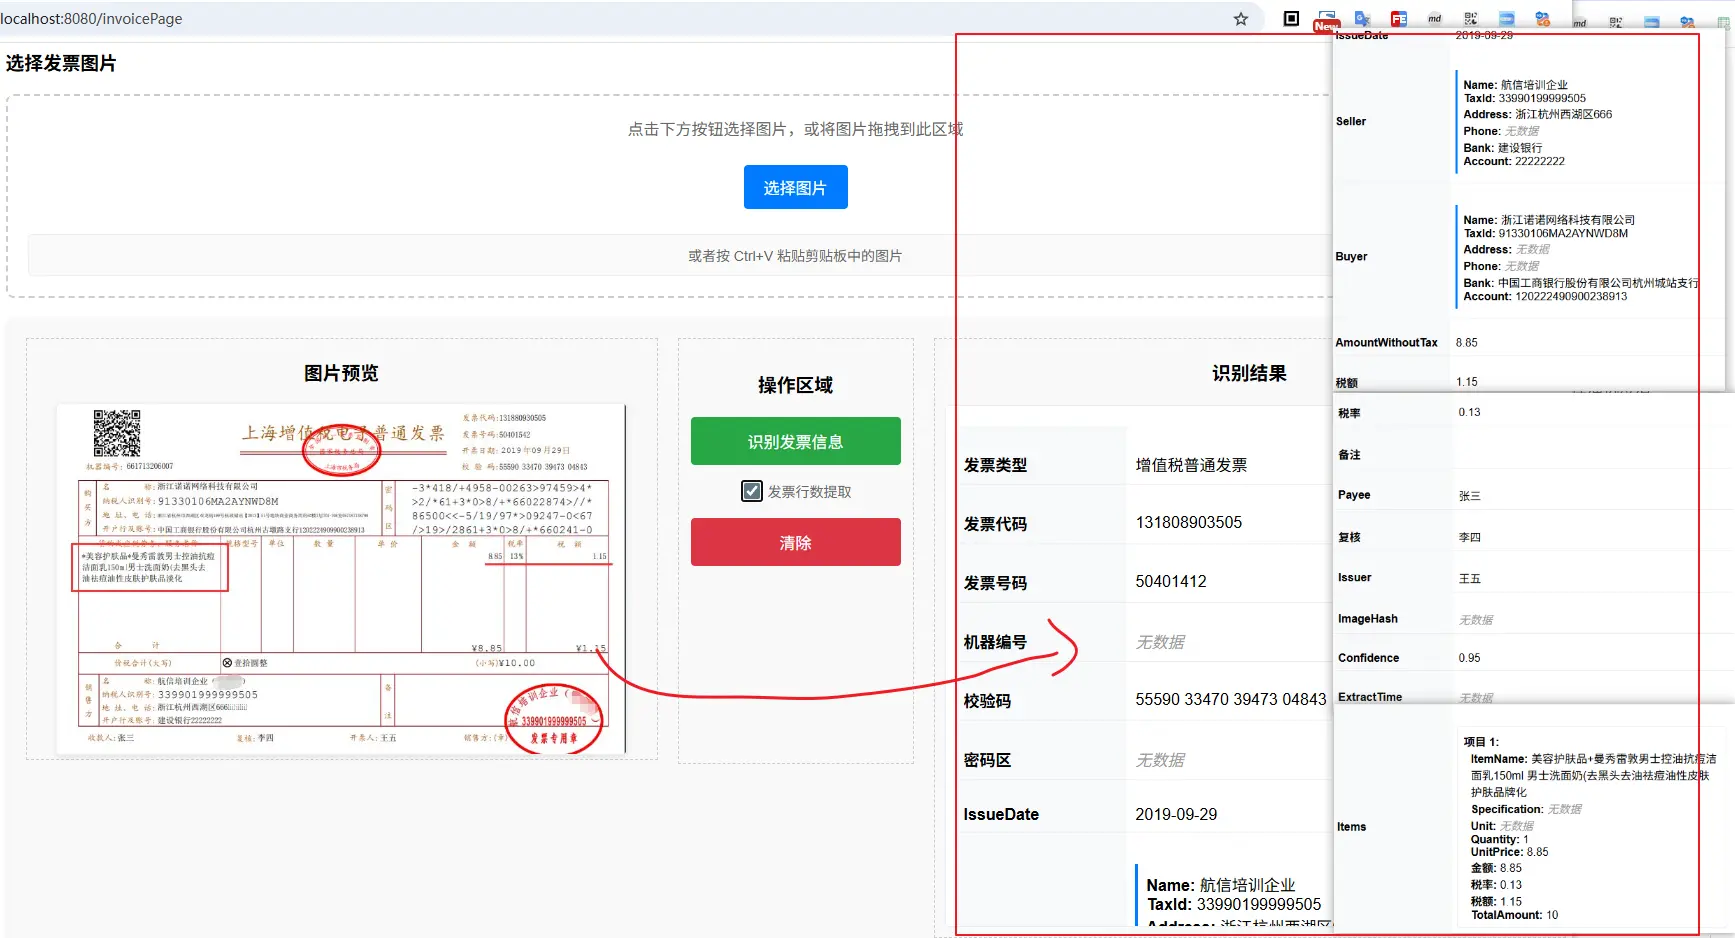
到这里,发票提取的核心服务层已基本满足要求,关于存储层的缓存和持久化,相对来说属于常见的后端实现技术栈,就不详细展开了; 那么这个实现是否可以直接应用于生产使用呢?
接下来我们看看若用于生产,还需要做哪些优化
五、生产优化
5.1 发票行数据超过大模型上下文窗口
5.1.1 问题描述
发票上的基本票面信息数据量还算可控,但是开票行(即商品、服务明细)这里可能就非常多了,比如我一单买了五六十个商品、而这些商品全部放在一张发票上,当我们提取发票信息时,会发现大模型无法返回完整的数据结构(超出内容被截断了————即便我的提示词明确要求了,不要截断也没有效果)
如使用GLM-4V-Flash 对一张有十个开票行的发票进行提取时:
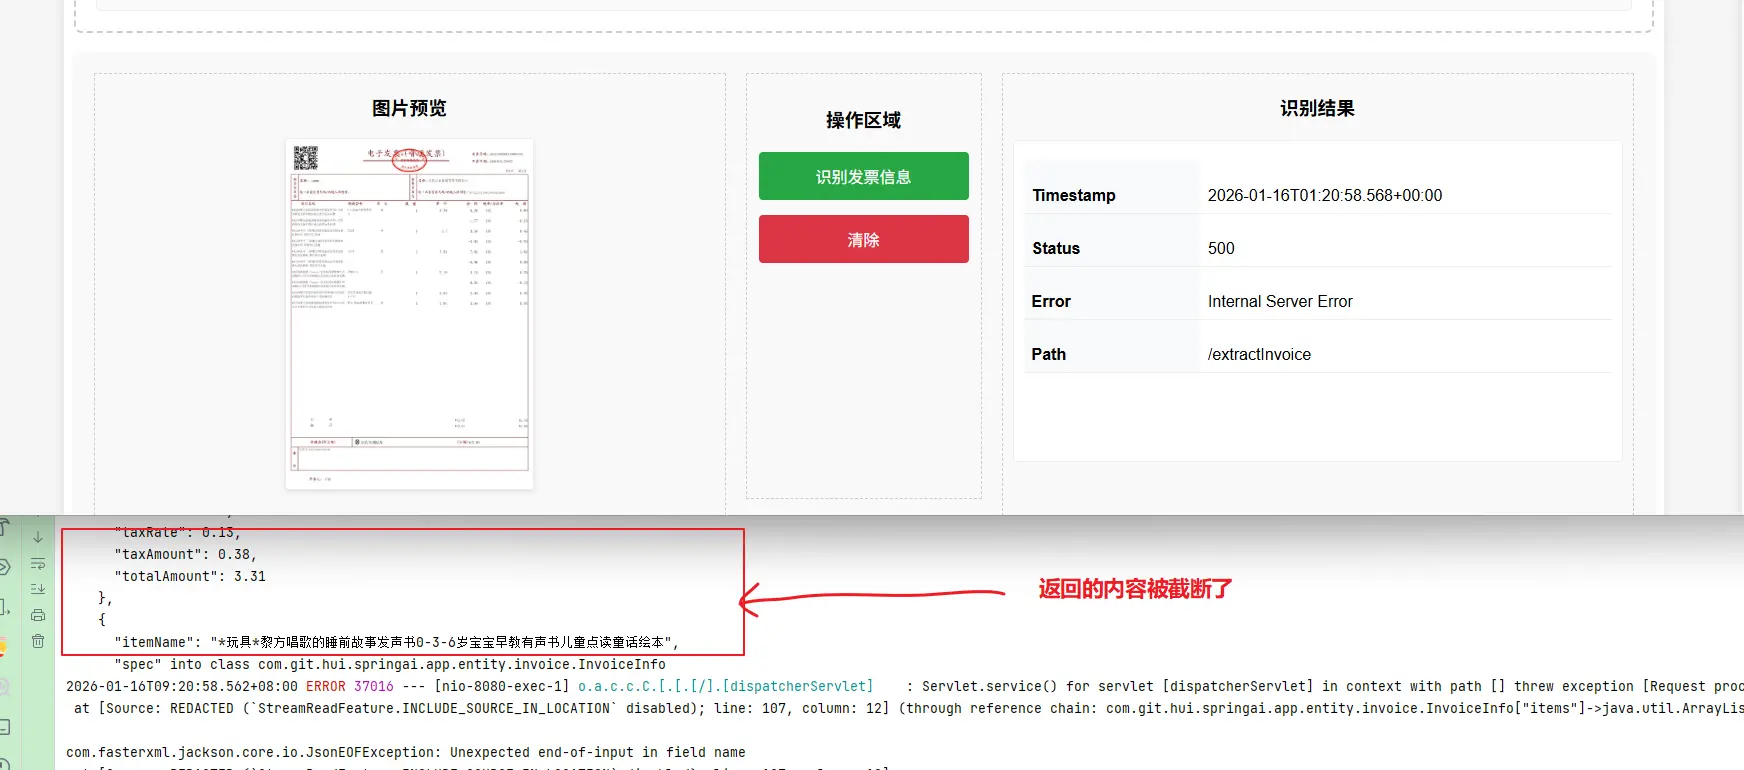
上面的示例输出中,从大模型的返回也可以看出,返回结果被截断了,导致返回的是一个不完整的数据结构,因此在结构化为java bean对象时,就报错了
那么怎么解决呢?
换上下文窗口更大的模型,比如
GLM-4.1V-Thinking-Flash?
这当然是一个解决方案,但是并不彻底,因为大模型的上下文窗口是有限的,但是发票行却是不固定的;简单来说,我没法保证,换一个模型之后,就不会再出现返回结果被截断的情况了
那么有没有更彻底的解决方案呢?
分区域、分页提取
怎么理解这个解决方案呢?
我们可以套用一下传统的开发模式,当一次返回的数据太多时,我们很容易想到的解决方法时将一次的返回
- 改为分页返回,一次返回20条,若你需要再返回后20条 ———— 这种适用于列表的返回方式
参照这种思路,那么我们可以先定大模型,不要一次提取所有的开票行信息,而是按照我给他要求的进行分页提取;开票行的信息改成分页提取之后,但是其他的票面信息实际上只需要提取一次,因此我们可以将一次的提取过程,改为
- 只提取票面信息
- 分页提取开票行信息
5.1.2 票面基本信息提取
按照这种方式,我们可以重新设计两个提示词,只提取开票信息的提示词 prompts/invoice-basic-extract.st
你是一个专业的发票信息提取专家。请从用户提供的发票图片中提取完整的结构化信息。

必须遵循:
1. 准确识别发票类型(增值税专用发票、增值税普通发票、电子普通发票等)
2. 提取所有关键字段:发票代码、发票号码、开票日期、校验码等
3. 识别购销双方完整信息(名称、纳税人识别号、地址电话、开户行及账号)
4. 识别备注、收款人、复核人、开票人等信息
5. 对于模糊或不清晰或无法识别的字段,请使用null值。
6. 请确保所有金额字段为数字类型,日期为字符串格式。
7. 请务必返回完整内容,不要截断JSON。

输出格式要求:
请严格按照以下JSON格式输出,不要包含任何额外文本:
对应的实现逻辑也比较简单了,因为我们返回不要开票行,所以我们可以将前面定义的数据结构 InvoiceInfo 进行改造,向上提取一层BaseInvoiceInfo基础类,相比于之前的实现,这个基础类中,不包含List<InvoiceItem> items
@Data
@JsonClassDescription(value = "发票基本信息,不包含商品行信息")
public class BaseInvoiceInfo {
  // ...省略
}

@Data
@JsonClassDescription(value = "发票完整信息")
public class InvoiceInfo extends BaseInvoiceInfo {
    @JsonPropertyDescription(value = "商品/服务明细列表")
    private List<InvoiceItem> items;
}
然后参照上面的发票提取方案,实现对应的发票基本信息提取核心逻辑
@Slf4j
@Service
public class InvoiceExtractionService {
    @Value("classpath:/prompts/invoice-basic-extract.st")
    private Resource baseInvoiceSystemPrompt;


    /**
     * 识别发票基础内容(不包含商品明细)
     *
     * @param imageBytes 图片字节
     * @param mimeType   图片类型
     * @param msg        识别提示信息
     * @return
     */
    public BaseInvoiceInfo extractBaseInvoice(byte[] imageBytes, MimeType mimeType, String msg) {
        Message systemMsg = new SystemMessage(baseInvoiceSystemPrompt);
        String message = (msg != null && !msg.isEmpty()) ? msg : "请将发票图片内容进行识别,并返回结构化的发票信息";

        Media media = Media.builder()
                .mimeType(mimeType)
                .data(imageBytes)
                .build();
        Message userMsg = UserMessage.builder().text(message).media(media).build();
        Prompt prompt = new Prompt(List.of(systemMsg, userMsg));
        BaseInvoiceInfo invoiceInfo = chatClient.prompt(prompt).call().entity(BaseInvoiceInfo.class);
        log.info("解析的结果: \n{}", toStr(invoiceInfo));
        return invoiceInfo;
    }
}
5.1.3 分页提取发票行
分页提取开票行的提示词 prompts/invoice-items-extract.st
你是一个专业的发票信息提取专家。请从发票图片中提取商品明细的第$start$行到第$end$行。

提取要求:
1. 只提取指定行数范围的商品明细
2. 每行需要提取以下字段:
   - 商品名称
   - 规格型号(如有)
   - 单位
   - 数量
   - 单价
   - 金额
   - 税率
   - 税额
   - 价税合计

3. 如果指定范围内没有足够的行数,提取实际存在的行数
4. 如果无法识别某行,则这一行返回一个空对象进行占位,始终保证返回的行数与实际的一致

始终遵循以下规则:
- 严格按照从上到下的顺序计数,并且按照顺序提取,从第0行开始计数
- 只提取第$start$行到第$end$行内容,必须包含第$start$行,不包含第$end$行,不要提取其他行的内容

输出格式要求:
请返回JSON数组格式,每个元素代表一行:
[
  {
    "rowNumber": 1,
    "itemName": "商品名称",
    "specification": "规格型号",
    "unit": "单位",
    "quantity": 1.0,
    "unitPrice": 1000.00,
    "amount": 1000.00,
    "taxRate": 0.13,
    "taxAmount": 130.00,
    "totalAmount": 1130.00,
    "confidence": 0.95
  },
]

如果提取失败或没有找到指定行,返回空数组 []。
注意上面的提示词,因为返回提示词模板中,提供了
json示例,如果此时我们依然使用默认的{}来表示模板变量,就会导致解析异常 (SpringAI的提示词模板解析器会将json样例中{}也认为需要进行变量替换),为了避免这种问题,在这里,我们使用自定义的$$来包裹模板变量
一个基础的分页提取发票行实现如
@Slf4j
@Service
public class InvoiceExtractionService {
    @Value("classpath:/prompts/invoice-items-extract.st")
    private Resource invoiceItemPrompt;

    private List<InvoiceItem> extractInvoiceItems(Media media, Integer start, Integer end) {
        PromptTemplate promptTemplate = PromptTemplate.builder()
                // 因为提示词中返回的json对象中,有 {},所以使用默认的 {} 来替换占位变量,会报错
                .renderer(StTemplateRenderer.builder().startDelimiterToken('$').endDelimiterToken('$').build())
                .resource(invoiceItemPrompt)
                .build();
        String sys = promptTemplate.render(Map.of("start", start, "end", end));
        SystemMessage systemMsg = new SystemMessage(sys);

        UserMessage userMsg = UserMessage.builder().media(media).text("提取" + start + "行到" + end + "行发票商品信息,注意不包含第" + end + "行").build();
        Prompt prompt = new Prompt(List.of(systemMsg, userMsg));
        List<InvoiceItem> items = chatClient.prompt(prompt).call().entity(new ParameterizedTypeReference<List<InvoiceItem>>() {
        });
        return items;
    }
}
5.1.4 完整的大发票提取
然后就是提供一个外部的访问入口,直接基于上面的两个基础实现,来获取大发票的完整信息提取
/**
 * 识别发票中商品行较多的发票内容
 * <p>
 * - 图片中的信息,超过窗口上下文的场景,我们需要进行分批处理
 *
 * @param imageBytes 图片字节
 * @param mimeType   图片类型
 * @param msg        识别提示信息
 * @return
 */
public InvoiceInfo extractInvoiceWitInhItems(byte[] imageBytes, MimeType mimeType, String msg) {
    Media media = Media.builder()
            .mimeType(mimeType)
            .data(imageBytes)
            .build();
    // 提取发票基本信息
    CompletableFuture<BaseInvoiceInfo> infoFuture = CompletableFuture.supplyAsync(() -> {
        BaseInvoiceInfo invoiceInfo = extractBaseInvoice(imageBytes, mimeType, msg);
        return invoiceInfo;
    });

    // 分页提取发票行
    CompletableFuture<List<InvoiceItem>> itemFuture = CompletableFuture.supplyAsync(() -> {
        final int step = 5;
        int start = 0, end = step;
        List<InvoiceItem> totalItems = new ArrayList<>();
        while (true) {
            log.info("开始处理:{} - {}", start, end);
            List<InvoiceItem> items = extractInvoiceItems(media, start, end);
            if (CollectionUtils.isEmpty(items)) {
                break;
            }
            totalItems.addAll(items);
            if (items.size() < end - start) {
                break;
            } else {
                start += step;
                end += step;
            }
        }
        return totalItems;
    });

    // 等待两个任务完成
    CompletableFuture.allOf(infoFuture, itemFuture).join();

    // 构建完整的返回结果
    InvoiceInfo invoiceInfo = new InvoiceInfo();
    try {
        BeanUtils.copyProperties(infoFuture.get(), invoiceInfo);
        invoiceInfo.setItems(itemFuture.get());
    } catch (Exception e) {
        throw new RuntimeException(e);
    }
    return invoiceInfo;
}
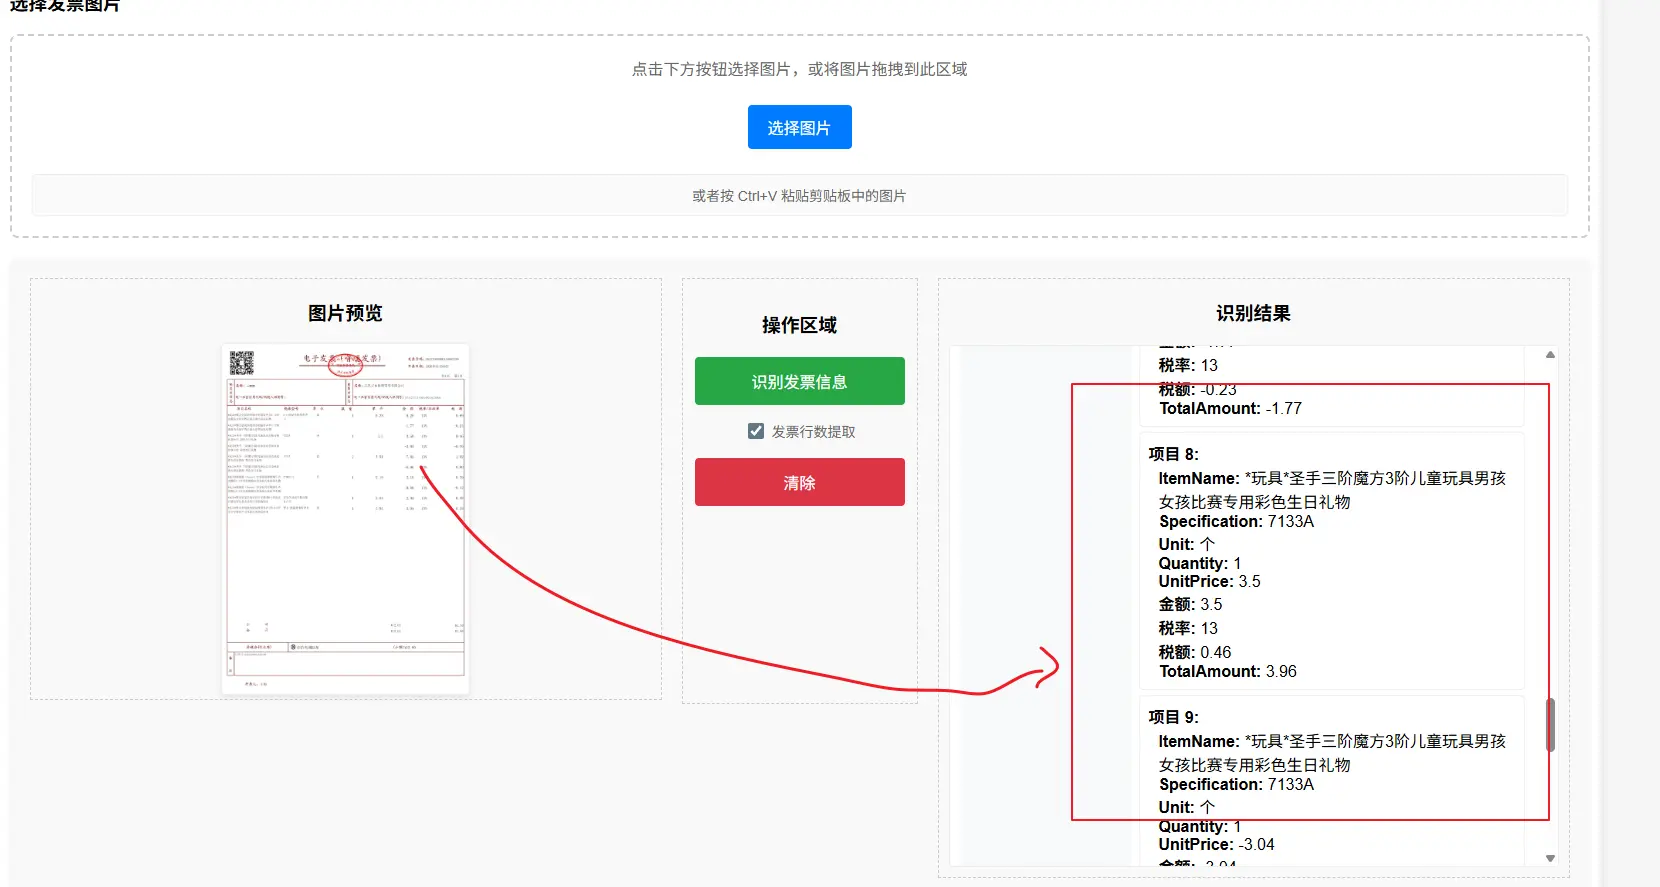
我们使用上下文窗口更小、响应更快的 GLM-4V-Flash 模型来演示这个分页提取,如使用项目中的test/resources/pupiao.jpg为例,即便这个发票中有十行,也可以一并输出
5.1.5 方案优化
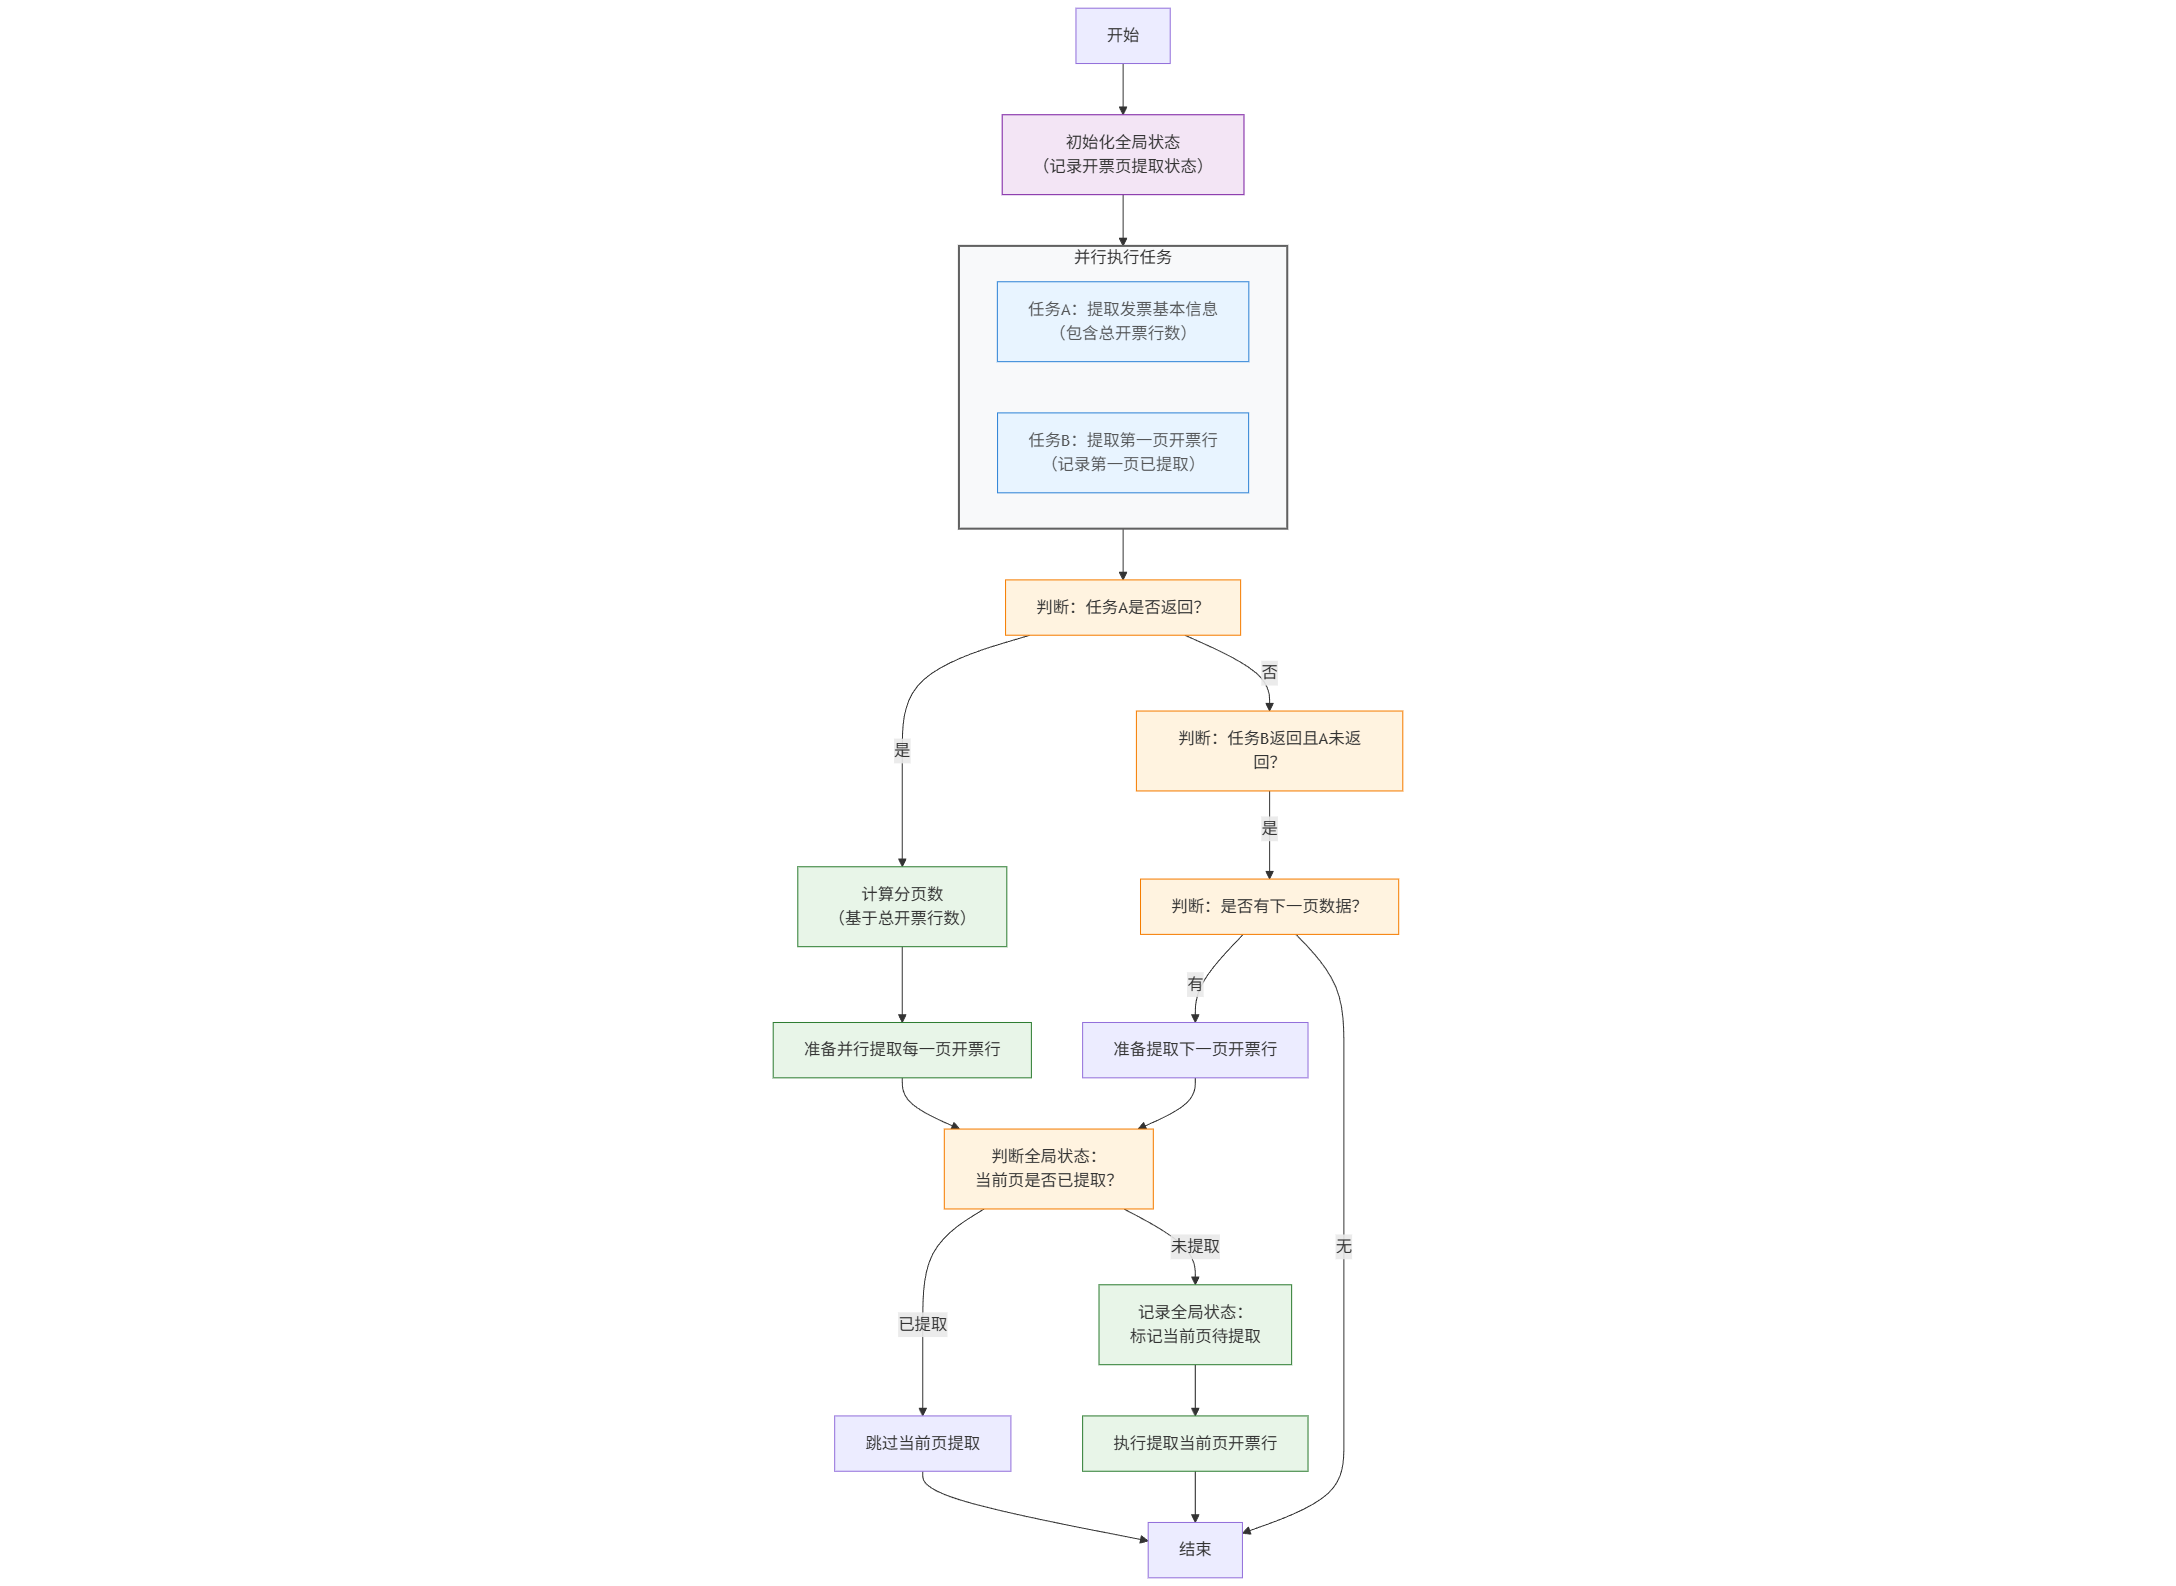
虽然实现了分页的开票行信息提取,但是这个实现是一个明显的串行化方案;对应的当开票行数据越多,整个服务的耗时就会越大
自然,我们就会有一个改进方案,在返回发票基本信息的同时,返回总的开票行数,然后就可以基于这个总数来计算分页,这样就可以通过并行的方案,实现分页开票行提取,一个可行的实现流程图如下
flowchart TB
    %% 全局样式配置:专业简洁,适配技术人员阅读
    classDef base font-size:11px, rounded:8, stroke-width:1.5
    classDef parallel fill:#e6f4ff,stroke:#1976d2,opacity:0.9
    classDef judge fill:#fff3e0,stroke:#f57c00
    classDef process fill:#e8f5e8,stroke:#2e7d32
    classDef state fill:#f3e5f5,stroke:#7b1fa2

    %% 起始节点
    Start[开始]
    GlobalState["初始化全局状态<br/>(记录开票页提取状态)"]

    %% 并行执行块
    subgraph "并行执行任务"
        style 并行执行任务 fill:#f8f9fa,stroke:#616161,stroke-width:2
        A["任务A:提取发票基本信息<br/>(包含总开票行数)"]
        B["任务B:提取第一页开票行<br/>(记录第一页已提取)"]
    end

    %% 条件判断与处理节点
    JudgeA["判断:任务A是否返回?"]
    CalcPage["计算分页数<br/>(基于总开票行数)"]
    PrepareParallel["准备并行提取每一页开票行"]
    CheckGlobal["判断全局状态:<br/>当前页是否已提取?"]
    Skip["跳过当前页提取"]
    RecordState["记录全局状态:<br/>标记当前页待提取"]
    ExtractPage["执行提取当前页开票行"]

    JudgeB["判断:任务B返回且A未返回?"]
    JudgeNext["判断:是否有下一页数据?"]
    PrepareNext["准备提取下一页开票行"]

    %% 流程连接
    Start --> GlobalState
    GlobalState --> 并行执行任务
    并行执行任务 --> JudgeA

    %% 任务A返回分支
    JudgeA -- 是 --> CalcPage
    CalcPage --> PrepareParallel
    PrepareParallel --> CheckGlobal

    %% 全局状态判断分支
    CheckGlobal -- 已提取 --> Skip
    CheckGlobal -- 未提取 --> RecordState
    RecordState --> ExtractPage

    %% 任务A未返回(B返回)分支
    JudgeA -- 否 --> JudgeB
    JudgeB -- 是 --> JudgeNext
    JudgeNext -- 有 --> PrepareNext
    PrepareNext --> CheckGlobal
    JudgeNext -- 无 --> End

    %% 收尾节点
    Skip --> End
    ExtractPage --> End
    End[结束]

    %% 样式绑定
    class A,B parallel
    class JudgeA,JudgeB,JudgeNext,CheckGlobal judge
    class CalcPage,PrepareParallel,ExtractPage,RecordState process
    class GlobalState state
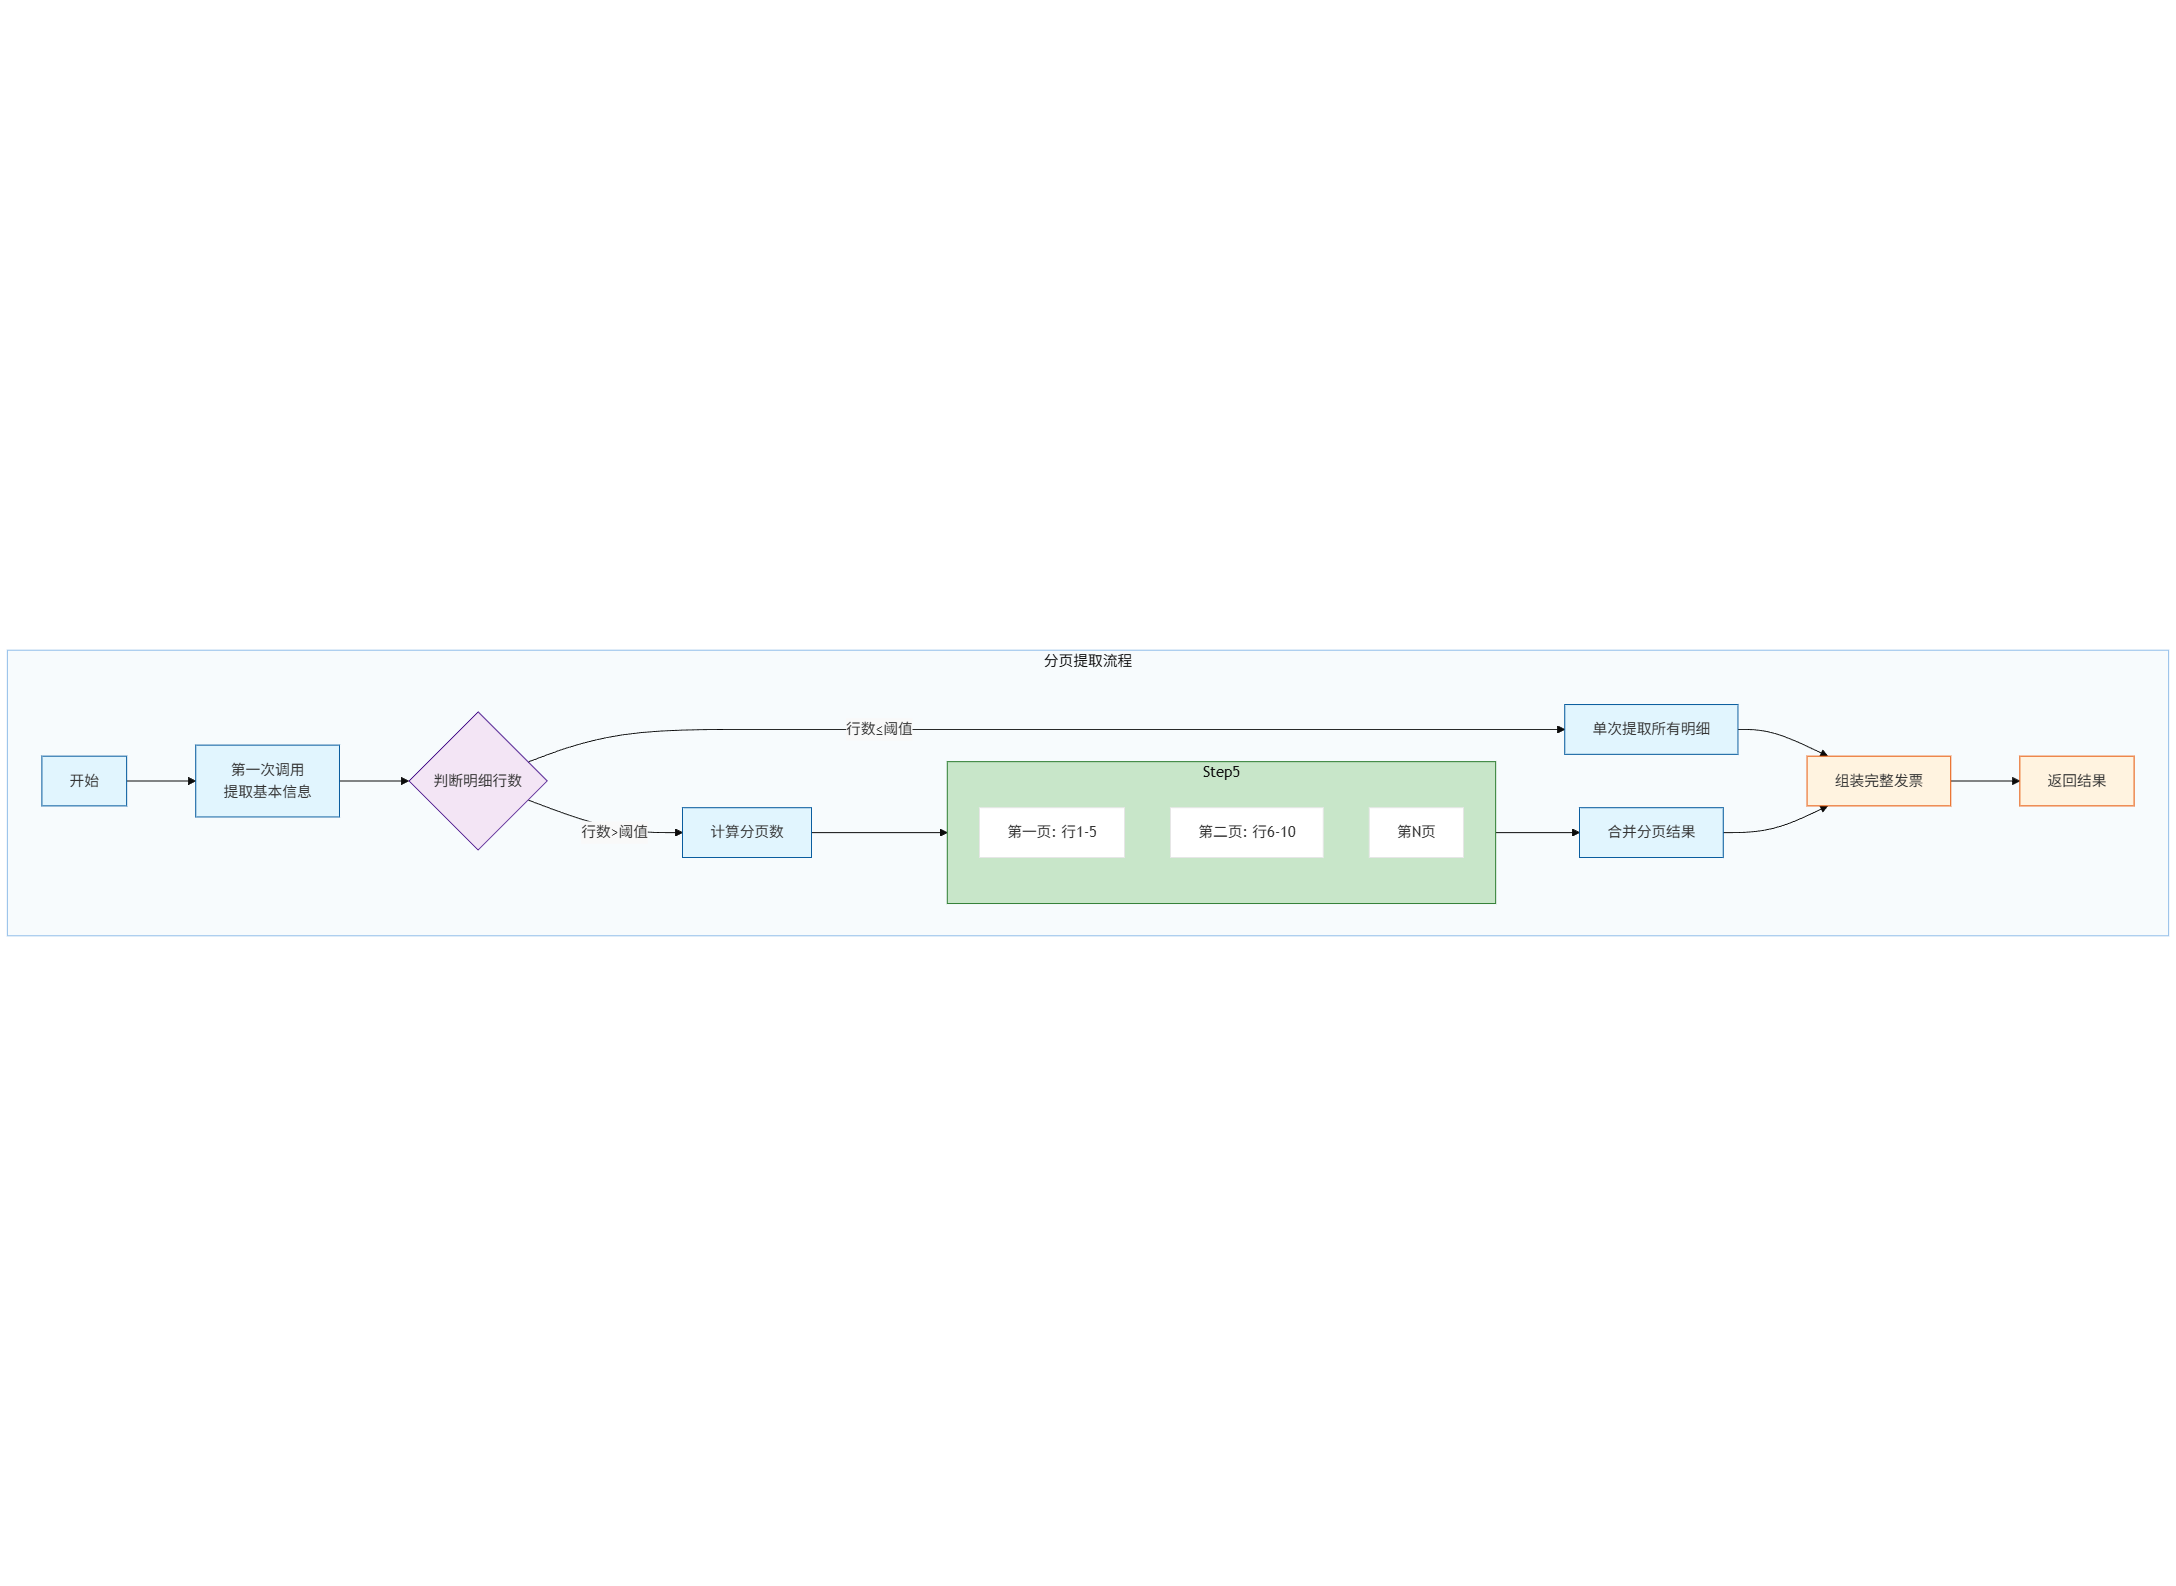
若是觉得上面这个看起来有些复杂的话,也可以看下面这个简版方案,思路实际上是一致的
flowchart TB
%%{init: { "theme": "base", "themeVariables": { "primaryColor": "#ffffff", "secondaryColor": "#f9f9f9", "tertiaryColor": "#eeeeee", "textColor": "#333", "fontSize": "16px", "subgraph_border_color": "#666", "subgraph_fill": "#e0e0e0" } } }%%
graph TB
    subgraph SA["分页提取流程"]
        style SA fill:#f0f8fb,stroke:#1976d2,stroke-width:1,opacity:0.5
        Start[开始] --> Step1[第一次调用<br>提取基本信息]
        Step1 --> Step2{判断明细行数}

        Step2 -->|行数≤阈值| Step3[单次提取所有明细]
        Step2 -->|行数>阈值| Step4[计算分页数]

        Step4 --> Step5[并行分页提取]

        subgraph Step5
            Page1[第一页: 行1-5]
            Page2[第二页: 行6-10]
            PageN[第N页]
        end

        Step5 --> Step6[合并分页结果]
        Step3 --> Step7[组装完整发票]
        Step6 --> Step7

        Step7 --> End[返回结果]
    end

    classDef process fill:#e1f5fe,stroke:#01579b
    classDef decision fill:#f3e5f5,stroke:#4a148c
    classDef parallel fill:#c8e6c9,stroke:#2e7d32
    classDef result fill:#fff3e0,stroke:#e65100

    class Start,Step1,Step3,Step4,Step6,Step7,End process
    class Step2 decision
    class Step5 parallel
    class Step7,End result
具体的实现就省略了,有兴趣的小伙伴可以自行补全🤣
5.2 图片预处理
在实际的生产场景中,我们没办法保证用户上传的始终时数电开出来的电子票原件,可能是经过打印、拍照等各种操作之后上传的图片,此时直接拿来解析一般效果较差,通常一个完整可直接商用的发票识别,很大概率会有第一步的图片预处理阶段,当然这一块不是大模型提取的关键点(非大模型的实现中也会有这一步),下面是一个可参考的预处理方案
@Component
@Slf4j
public class ImagePreprocessor {

    @Value("${invoice.image.quality.threshold:0.8}")
    private double qualityThreshold;

    @Value("${invoice.image.max-size:5242880}")
    private long maxImageSize;

    /**
     * 图片预处理流水线
     */
    public ProcessedImage preprocessImage(MultipartFile imageFile) {
        try {
            // 1. 验证图片
            validateImage(imageFile);

            // 2. 读取图片
            BufferedImage originalImage = ImageIO.read(imageFile.getInputStream());

            // 3. 质量评估
            double qualityScore = assessImageQuality(originalImage);
            if (qualityScore < qualityThreshold) {
                log.warn("图片质量较低: {}", qualityScore);
            }

            // 4. 图像增强
            BufferedImage enhancedImage = enhanceImage(originalImage);

            // 5. 转换为Base64
            String base64Image = convertToBase64(enhancedImage);

            // 6. 生成哈希
            String imageHash = generateImageHash(originalImage);

            return ProcessedImage.builder()
                .originalImage(originalImage)
                .enhancedImage(enhancedImage)
                .base64Image(base64Image)
                .imageHash(imageHash)
                .qualityScore(qualityScore)
                .width(originalImage.getWidth())
                .height(originalImage.getHeight())
                .format(getImageFormat(imageFile))
                .build();

        } catch (Exception e) {
            throw new ImageProcessingException("图片预处理失败", e);
        }
    }

    /**
     * 图像增强:对比度增强、去噪、旋转校正
     */
    private BufferedImage enhanceImage(BufferedImage image) {
        // 转换为灰度图(提高OCR准确率)
        BufferedImage grayImage = convertToGrayscale(image);

        // 对比度增强
        BufferedImage contrastImage = enhanceContrast(grayImage);

        // 降噪处理
        BufferedImage denoisedImage = applyDenoising(contrastImage);

        // 自动旋转校正(基于文本方向)
        BufferedImage rotatedImage = autoRotate(denoisedImage);

        return rotatedImage;
    }

    /**
     * 自动旋转校正
     */
    private BufferedImage autoRotate(BufferedImage image) {
        try {
            // 使用Tesseract检测文本方向
            ITesseract tesseract = new Tesseract();
            tesseract.setDatapath("tessdata");
            tesseract.setLanguage("chi_sim+eng");

            // 设置PSM为自动检测方向
            tesseract.setPageSegMode(ITesseract.PageSegMode.PSM_AUTO_OSD);

            // 获取方向信息
            int orientation = tesseract.getOrientations(image);

            // 根据方向进行旋转
            return rotateImage(image, orientation);

        } catch (Exception e) {
            log.warn("自动旋转失败,使用原图", e);
            return image;
        }
    }

    private double assessImageQuality(BufferedImage image) {
        // 1. 清晰度评估(使用拉普拉斯方差)
        double sharpness = calculateSharpness(image);

        // 2. 亮度评估
        double brightness = calculateBrightness(image);

        // 3. 对比度评估
        double contrast = calculateContrast(image);

        // 4. 综合质量评分
        double qualityScore = sharpness * 0.4 + brightness * 0.3 + contrast * 0.3;

        return Math.min(Math.max(qualityScore, 0), 1);
    }
}
5.3 Function Calling实现数据验证
对于大模型的返回,我们可以结合 Functino Calling的机制,来实现数据验证,从而实现 ReAct 的多轮交互,比如一个非常基础的字段合法性校验如下:
@Component
public class InvoiceValidationService {
    @Tool(
            name = "validateInvoiceFields",
            description = "验证发票字段的合法性和一致性"
    )
    public ValidationResult validateInvoice(
            @ToolParam(description = "发票代码") String invoiceCode,
            @ToolParam(description = "发票号码") String invoiceNumber,
            @ToolParam(description = "开票日期") String issueDate,
            @ToolParam(description = "不含税金额") BigDecimal amountWithoutTax,
            @ToolParam(description = "税额") BigDecimal taxAmount,
            @ToolParam(description = "价税合计") BigDecimal totalAmount
    ) {
        ValidationResult result = new ValidationResult();
        List<ValidationError> errors = new ArrayList<>();

        // 1. 验证发票代码格式(12位数字)
        if (invoiceCode != null && !invoiceCode.matches("\\d{12}")) {
            errors.add(new ValidationError("invoiceCode", "发票代码必须是12位数字"));
        }

        // 2. 验证发票号码格式(8位数字)
        if (invoiceNumber != null && !invoiceNumber.matches("\\d{8}")) {
            errors.add(new ValidationError("invoiceNumber", "发票号码必须是8位数字"));
        }

        // 3. 验证日期格式
        if (issueDate != null) {
            try {
                LocalDate.parse(issueDate);
            } catch (Exception e) {
                errors.add(new ValidationError("issueDate", "开票日期格式错误"));
            }
        }

        // 4. 验证金额关系
        if (amountWithoutTax != null && taxAmount != null && totalAmount != null) {
            BigDecimal calculatedTotal = amountWithoutTax.add(taxAmount);
            BigDecimal diff = totalAmount.subtract(calculatedTotal).abs();

            if (diff.compareTo(new BigDecimal("0.01")) > 0) {
                errors.add(new ValidationError("amounts",
                        String.format("金额计算不一致: 不含税(%.2f) + 税额(%.2f) ≠ 合计(%.2f)",
                                amountWithoutTax, taxAmount, totalAmount)));
            }
        }

        // 5. 验证纳税人识别号(15-20位)
        // 这里可以添加更复杂的验证逻辑

        result.setErrors(errors);
        result.setValid(errors.isEmpty());
        result.setValidationTime(LocalDateTime.now());

        return result;
    }

    @Data
    public static class ValidationResult {
        private boolean valid;
        private List<ValidationError> errors;
        private LocalDateTime validationTime;
    }

    public record ValidationError(String field, String message) {
    }
}
除了上面这个之外,我们还可以对纳锐人识别号、企业名称进行合法性校验(比如通过内部维护的映射或者外部的企查查之类的接口来实现)
当然这些属于辅助手段,不加貌似也没有太大的问题🤣
5.4 降级策略:传统OCR备用方案
最后在生产环境中,难免会有一些突发情况,所以一个健壮的系统,对应的降级方案是不可缺少的,比如加一个ocr的备用方案
@Component
@Slf4j
public class FallbackOCRExtractor {

    @Autowired
    private AliYunOCRClient aliYunOCRClient;

    @Autowired
    private InvoiceTemplateMatcher templateMatcher;

    /**
     * 当大模型提取失败时的降级方案
     */
    public InvoiceInfo extractWithOCR(ProcessedImage processedImage) {
        try {
            // 1. 调用阿里云OCR
            OCRResponse ocrResponse = aliYunOCRClient.analyzeInvoice(
                processedImage.getBase64Image()
            );

            // 2. 使用模板匹配提取结构化信息
            Map<String, String> extractedFields = templateMatcher.matchAndExtract(
                ocrResponse.getTextBlocks()
            );

            // 3. 转换为InvoiceInfo对象
            InvoiceInfo invoiceInfo = convertToInvoiceInfo(extractedFields);

            // 4. 设置较低的置信度
            invoiceInfo.setConfidence(0.6);

            return invoiceInfo;

        } catch (Exception e) {
            log.error("OCR降级方案也失败", e);
            throw new InvoiceExtractException("所有提取方案均失败");
        }
    }
}
5.5 监控与指标
如果有必要有条件,基于Prometheus的监控加上可以说是一个资深程序猿的基本素养了,同样给一个简单的示例
@Component
@Slf4j
public class InvoiceExtractMetrics {

    private final MeterRegistry meterRegistry;

    // 提取成功率
    private final Counter successCounter;
    private final Counter failureCounter;

    // 处理时间直方图
    private final Timer extractTimer;

    // 图片质量分布
    private final DistributionSummary qualitySummary;

    public InvoiceExtractMetrics(MeterRegistry meterRegistry) {
        this.meterRegistry = meterRegistry;

        this.successCounter = Counter.builder("invoice.extract.success")
            .description("发票提取成功次数")
            .register(meterRegistry);

        this.failureCounter = Counter.builder("invoice.extract.failure")
            .description("发票提取失败次数")
            .register(meterRegistry);

        this.extractTimer = Timer.builder("invoice.extract.duration")
            .description("发票提取耗时")
            .publishPercentiles(0.5, 0.95, 0.99)
            .register(meterRegistry);

        this.qualitySummary = DistributionSummary.builder("invoice.image.quality")
            .description("发票图片质量评分")
            .register(meterRegistry);
    }

    public void recordSuccess(long duration, double quality) {
        successCounter.increment();
        extractTimer.record(duration, TimeUnit.MILLISECONDS);
        qualitySummary.record(quality);
    }

    public void recordFailure(String errorType) {
        failureCounter.increment();
        meterRegistry.counter("invoice.extract.error." + errorType).increment();
    }
}
六、部署方案
6.1 Docker容器化
# Dockerfile
FROM openjdk:17-jdk-slim as builder
WORKDIR /D04-invoice-extraction
COPY . .
RUN chmod +x ./mvnw
RUN ./mvnw clean package -DskipTests
FROM openjdk:17-jdk-slim
WORKDIR /D04-invoice-extraction
# 安装Tesseract OCR(用于降级方案)
RUN apt-get update && apt-get install -y \
tesseract-ocr \
tesseract-ocr-chi-sim \
libtesseract-dev \
&& rm -rf /var/lib/apt/lists/*
# 复制应用
COPY /D04-invoice-extraction/target/D04-invoice-extraction-0.0.1-SNAPSHOT.jar app.jar
COPY /D04-invoice-extraction/tessdata /usr/share/tessdata
# 创建非root用户
RUN useradd -m -u 1000 spring
USER spring
EXPOSE 8080
ENTRYPOINT ["java", "-jar", "app.jar", "--spring.ai.zhipuai.api-key=${ZHIPU_KEY}"]
6.2 Kubernetes部署
# invoice-extract-deployment.yaml
apiVersion: apps/v1
kind: Deployment
metadata:
  name: invoice-extract-service
  namespace: finance
spec:
  replicas: 3
  selector:
    matchLabels:
      app: invoice-extract
  template:
    metadata:
      labels:
        app: invoice-extract
    spec:
      containers:
      - name: invoice-extract
        image: xxx/invoice-extract:1.0.0
        ports:
        - containerPort: 8080
        env:
        - name: ZHIPU_KEY
          valueFrom:
            secretKeyRef:
              name: ai-secrets
              key: zhipu-key
        - name: ALIYUN_ACCESS_KEY_ID
          valueFrom:
            secretKeyRef:
              name: aliyun-secrets
              key: access-key-id
        - name: ALIYUN_ACCESS_KEY_SECRET
          valueFrom:
            secretKeyRef:
              name: aliyun-secrets
              key: access-key-secret
        resources:
          requests:
            memory: "1Gi"
            cpu: "500m"
          limits:
            memory: "2Gi"
            cpu: "1000m"
        readinessProbe:
          httpGet:
            path: /actuator/health
            port: 8080
          initialDelaySeconds: 30
          periodSeconds: 10
        livenessProbe:
          httpGet:
            path: /actuator/health
            port: 8080
          initialDelaySeconds: 60
          periodSeconds: 30
---
apiVersion: v1
kind: Service
metadata:
  name: invoice-extract-service
  namespace: finance
spec:
  selector:
    app: invoice-extract
  ports:
  - port: 80
    targetPort: 8080
  type: ClusterIP
七、大模型提取方案 VS 传统OCR发票识别方案
最后我们下来看一下,这个大模型的实现方案,与传统的发票识别方案两者之间有什么差异
7.1 传统方案技术架构
下面是一个经典的传统发票识别方案
%%{init: { "theme": "base", "themeVariables": { "primaryColor": "#ffffff", "secondaryColor": "#f9f9f9", "tertiaryColor": "#eeea", "textColor": "#333", "fontSize": "16px", "subgraph_border_color": "#666", "subgraph_fill": "#f0f0f0"} } }%%
graph TB
    %% 全局样式配置:提升研发视角的专业可读性
    style Input fill:#fafafa,stroke:#333,stroke-width:1.5px,font-weight:bold
    style Output fill:#ececff,stroke:#333,stroke-width:1.5px,font-weight:bold
    linkStyle default stroke:#666,stroke-width:1px,color:#333

    subgraph A1["传统OCR发票识别系统"]

        direction TB  // 整体改为自上而下,符合研发对流程的阅读习惯

        %% 预处理阶段:视觉强化+命名精准化
        subgraph A2["1. 图像预处理阶段"]
            style A2 fill:#e1f5fe,stroke:#01579b,stroke-width:1px,opacity:0.5
            direction LR
            P1[图像灰度化]
            P2[二值化处理]
            P3[噪声去除]
            P4[倾斜校正]
            P5[版面区域分析]
            %% 流程串联:简化箭头,提升连贯性
            P1 --> P2 --> P3 --> P4 --> P5
        end

        %% OCR识别阶段:补充逻辑标注
        subgraph A3["2. OCR字符识别阶段"]
            style A3 fill:#f3e5f5,stroke:#4a148c,stroke-width:1px,opacity:0.5
            direction LR
            O1[字符分割]
            O2[特征提取<small>(轮廓/纹理)</small>]
            O3[字符识别<small>(模板/机器学习)</small>]
            O4[字符合并<small>(行/字段级)</small>]
            O1 --> O2 --> O3 --> O4
        end

        %% 模板匹配阶段:命名更精准
        subgraph A4["3. 模板匹配提取阶段"]
            style A4 fill:#fff3e0,stroke:#e65100,stroke-width:1px,opacity:0.5
            direction LR
            T1[加载发票品类预定义模板]
            T2[字段坐标定位]
            T3[目标字段提取]
            T4[正则规则初筛]
            T1 --> T2 --> T3 --> T4
        end

        %% 规则处理阶段:补充逻辑闭环提示
        subgraph A5["4. 业务规则校验阶段"]
            style A5 fill:#c8e6c9,stroke:#2e7d32,stroke-width:1px,opacity:0.5
            direction LR
            R1[行业规则引擎]
            R2[关键字精准匹配]
            R3[字段格式验证<small>如税号/金额</small>]
            R4[跨字段逻辑校验<small>价税合计</small>]
            R1 --> R2 --> R3 --> R4
        end

        %% 后处理阶段:补充人工核验的闭环逻辑(研发关注的异常流程)
        subgraph A6["5. 结果后处理阶段"]
            style A6 fill:#fce4ec,stroke:#ad1457,stroke-width:1px,opacity:0.5
            direction LR
            H1[数据清洗<small>去重/补空</small>]
            H2[格式标准化<small>统一JSON/DB格式</small>]
            H3{人工核验}
            H4[模板迭代更新]

            H1 --> H2 --> H3
            H3 -- 核验通过 --> Output[结构化发票数据]
            H3 -- 核验不通过 --> H4 --> P1
        end

        %% 主流程串联:简化线条,逻辑更顺
        Input[发票图片输入] --> P1
        P5 --> O1
        O4 --> T1
        T4 --> R1
        R4 --> H1
    end

    %% 样式优化:保留原有配色体系,增强视觉区分度
    classDef preprocess fill:#e1f5fe,stroke:#01579b,stroke-width:1.5px,font-size:12px
    classDef ocr fill:#f3e5f5,stroke:#4a148c,stroke-width:1.5px,font-size:12px
    classDef template fill:#fff3e0,stroke:#e65100,stroke-width:1.5px,font-size:12px
    classDef rule fill:#c8e6c9,stroke:#2e7d32,stroke-width:1.5px,font-size:12px
    classDef post fill:#fce4ec,stroke:#ad1457,stroke-width:1.5px,font-size:12px

    class P1,P2,P3,P4,P5 preprocess
    class O1,O2,O3,O4 ocr
    class T1,T2,T3,T4 template
    class R1,R2,R3,R4 rule
    class H1,H2,H3,H4 post
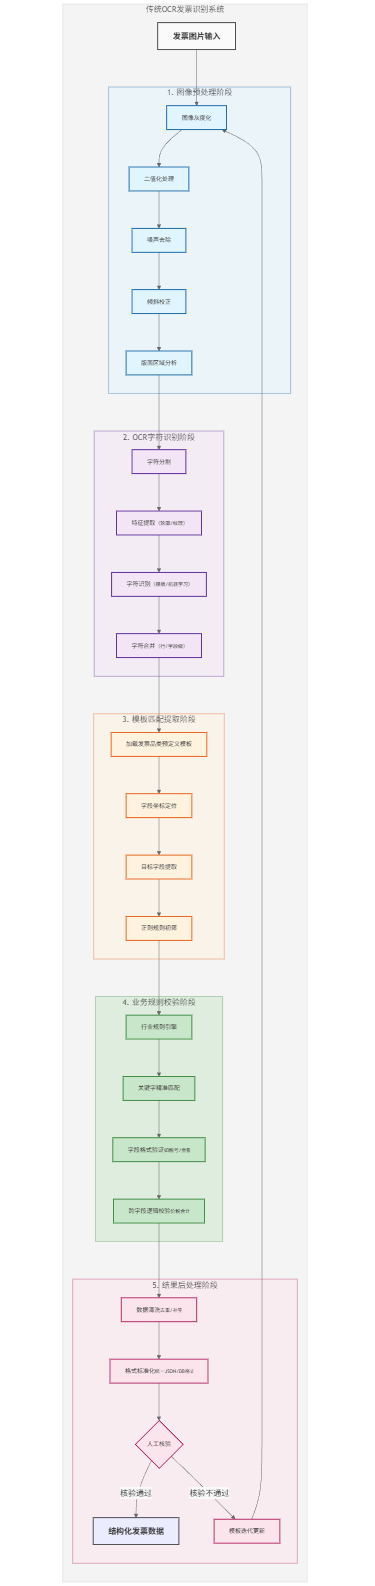
在传统的方案中,主要分五部分
- 图像预处理
- OCR字符识别
- 模板匹配提取
- 业务规则校验
- 结果处理
其中核心的实现会聚焦在 模板匹配 + 业务规则校验,同样也因为不同的模板的差异性,导致整个方案的挑战点在于
| 问题类别 | 具体表现 |
|---|---|
| 模板依赖 | 每新增一种发票类型需配置新模板 |
| 位置敏感 | 发票版式变化导致提取失败 |
| 泛化能力差 | 无法处理未见过的发票格式 |
| 规则复杂 | 维护大量正则表达式和规则 |
| 容错性差 | OCR识别错误直接导致提取错误 |
| 语义理解缺失 | 无法理解字段间的关系和含义 |
| 维护成本高 | 需要持续维护模板和规则库 |
7.2 大模型方案 VS 传统方案
基于技术方案的对比
| 维度 | 传统OCR方案 | 大模型智能体方案 |
|---|---|---|
| 核心技术 | 图像处理 + 规则引擎 | 多模态大模型 + 语义理解 |
| 处理逻辑 | "如果-那么"规则链 | 端到端语义理解 |
| 模板依赖 | 强依赖,每款发票需模板 | 零模板,通用处理 |
| 泛化能力 | 差,只能处理已知格式 | 强,能处理未见格式 |
| 语义理解 | 无,仅文本匹配 | 强,理解字段含义和关系 |
| 容错能力 | 差,OCR错误即失败 | 强,能根据上下文纠正 |
| 维护成本 | 高,需持续维护模板规则 | 低,基本无需维护 |
| 扩展性 | 差,新增类型需开发 | 强,通过Prompt调整即可 |
| 准确性 | 高 | 低,相较于传统方案每一次的输出都存在不确定性 |
从性能、实现角度进行对比
| 指标 | 传统OCR方案 | 大模型智能体方案 |
|---|---|---|
| 首次部署时间 | 2-4周(模板开发) | 1-3天(Prompt调优) |
| 新增模板时间 | 1-3天/模板 | 几乎为0 |
| 处理准确率 | 70-85%(复杂场景) | 90-98% |
| 泛化能力 | 只能处理已知模板 | 可处理未知格式 |
| 维护人力 | 全职1-2人 | 兼职0.5人 |
| 容错能力 | 低(严格依赖OCR质量) | 高(语义纠错) |
| 处理速度 | 快(2-5秒) | 中等(3-10秒) |
| 硬件成本 | 低(CPU即可) | 高(需要GPU/API) |
从简单的方案对比,基于大模型的发票提取智能体,其**灵活性、可维护性、未来适应性(如国际业务)**方面明显由于传统的OCR方案,当然在准确度上,若有定向调教的小模型,其准确率完全有可能优于传统的OCR方案,当然它的成本比传统的要高,但若是考虑到维护的员工成本,那显然大模型的优势还是很明显的(当然如果已经有成熟可用的方案,能不改就不要改😊)
八、小结
本文以发票提取为切入点,构建了一个可生产使用的基于大模型的发票提取智能体,从具体的路径来看,这个系统的普适性很高,同样可以用于其他基于图片的结构化信息提取场景(比如快递面单的信息提取、身份证信息提取、简历信息提取等)
系统的核心功能单元:
- 多模态理解:基于大模型准确理解图片内容
- 智能提取:零配置提取任意版式发票信息
- 数据验证:通过Function Calling实现字段验证
- 降级策略:传统OCR备用方案保证服务可用性
- 生产就绪:包含缓存、监控、批量处理等企业级功能
技术知识点
下面是本文中涉及到的相关技术点(重点在大模型领域)
- 多模态
- 图文识别
- 提示词工程
- 大模型的分页交互如何实现
- Function Call
- 结构化输出
- 上下文窗口
对于大模型应用开发感兴趣的小伙伴,或者对上面提到的知识点有疑惑的小伙伴,不妨看看以下几篇内容(每篇耗时不超过五分钟😊)